How to Deploy to Amazon EKS With GitHub Actions and OIDC
In this guide, I’ll show you how to build a secure AWS EKS(Kubernetes) CI/CD pipeline for your FastAPI app complete with GitHub Actions, Docker, and OpenID Connect (OIDC) all while following AWS security best practices like least-privilege IAM policies. We won’t obsess over every detail of FastAPI or Docker, but we’ll cover enough to get your application running on EKS with confidence.
Note: The primary focus of this blog is on CI/CD processes and AWS configuration, so we won’t dive too deeply into FastAPI or Docker fundamentals.
Table of Contents
- Prerequisites
- Step 1: Set Up the GitHub Repository
- Step 2: Create an Amazon ECR Repository for Docker Images
- Step 3: Create an Amazon EKS Cluster Using Eksctl
- Step 4: Configure AWS OIDC for GitHub Actions Authentication
- Step 5: Build the GitHub Actions CI/CD Workflow
- Clean Up AWS EKS Resources
- Conclusion
Technologies and AWS Services Used
- AWS EKS (Kubernetes on AWS)
- FastAPI
- Amazon ECR
- Cloud Security & IAM
- Kubernetes Orchestration
Prerequisites for EKS Deployment With GitHub Actions
- AWS Account: Admin permissions for creating EKS clusters, IAM roles, and ECR repositories.
- AWS CLI installed and configured: Install Guide
- eksctl installed: Installation Guide
- Docker installed: Get Started with Docker
Why Use OIDC for GitHub Actions and AWS EKS
Managing Kubernetes on AWS via EKS is a great approach, but configuring secure access for CI/CD can be tricky. With OIDC, GitHub Actions can assume roles in AWS without storing secret keys, so no static credentials, Let’s walk through setting up an EKS cluster, creating an ECR repo, and configuring GitHub Actions to deploy our FastAPI service to Kubernetes automatically.
This guide walks through:
- Setting up an EKS cluster with eksctl
- Creating an ECR repository for your Docker images
- Configuring OIDC so GitHub Actions can assume an IAM role
- Deploying the FastAPI application to EKS
What You Will Learn in This EKS CI/CD Tutorial
- Security-First CI/CD: By using OIDC, there’s no need to embed AWS credentials in GitHub.
- Least-Privilege Access: You’ll attach minimal IAM permissions, restricted to your ECR repo or EKS cluster.
- Easy Automation: GitHub Actions automatically builds, pushes, and deploys whenever you push code to your main branch.
Step-by-Step: Deploy to EKS With GitHub Actions
Step 1: Set Up the GitHub Repository
Create (or use) a repository that holds your FastAPI app and Kubernetes manifests:
Repository Structure:
├── main.py        # FastApi application
├── Dockerfile        # Docker
├── fastapi-deploy.yaml           # deploy scripts
├── fastapi-service.yaml           # service scripts
└── requirements.txt
Keep your code organized. The .yaml files will be applied to EKS to deploy the FastAPI service.
Step 2: Create an Amazon ECR Repository for Docker Images
Amazon ECR is used to store your Docker images.
- Go to AWS Console > Search ECR > Create Repository
- Name it (e.g., fastapi-app) or anything you prefer
- Leave defaults, then Create
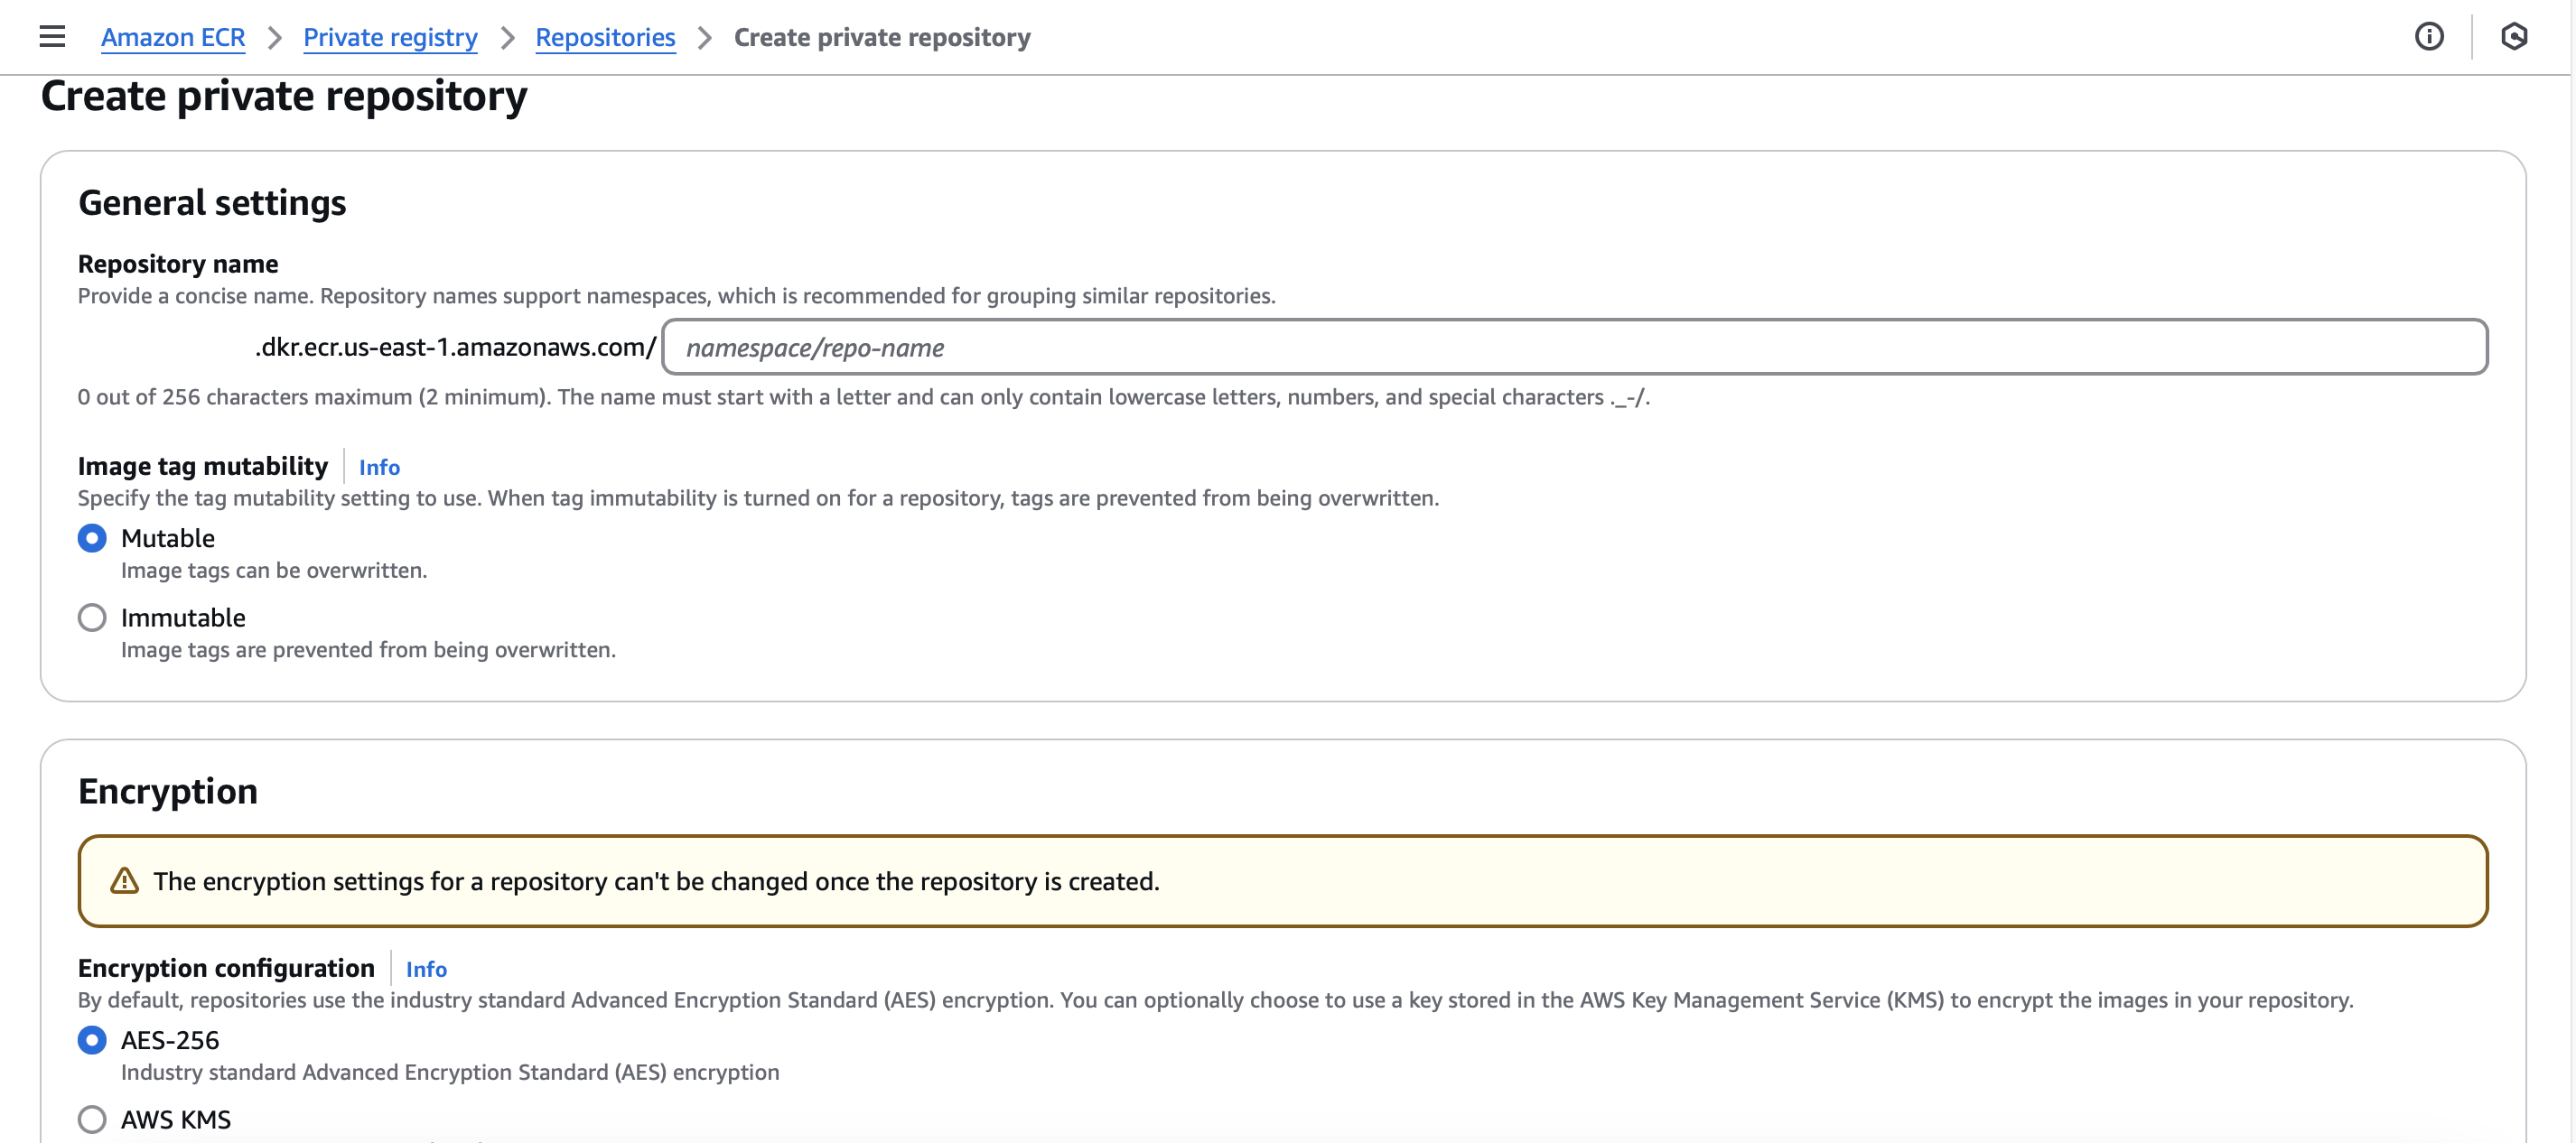
- Set the repository name: fastapi-app
- Leave the default settings
- click Create
View Repository Commands:
-
After creation select the repo
-
Click View push commands on your new repo to see the exact Docker build/push steps.
Retrieve the ECR ARN for use in IAM policies:
aws ecr describe-repositories --region us-east-1This is important if you want to create inline IAM policies restricting actions to this specific repository.
Step 3: Create an Amazon EKS Cluster Using Eksctl
Make sure you have the AWS CLI and Eksctl installed on your device to create the EKS cluster. Using eksctl, create the EKS cluster:
eksctl create cluster --name cluster-name \
                      --region <YOUR_REGION> \
                      --node-type instance-type \
                      --nodes-min 2 \
                      --nodes-max 6
I used.
eksctl create cluster --name fastapi-demo \
                      --region us-east-1 \
                      --node-type t3.medium \
                      --nodes-min 2 \
                      --nodes-max 6
This will take several minutes. Once finished, your kubeconfig will be updated so you can run kubectl commands against the new cluster.
Verify the cluster:
kubectl get nodesStep 4: Configure AWS OIDC for GitHub Actions Authentication
To avoid storing permanent AWS credentials in GitHub, we’ll configure OpenID Connect (OIDC) so GitHub Actions can assume roles in AWS. Guthub Action in AWS
If you have previously created a Identity provider for GitHub skip this step if not create one:
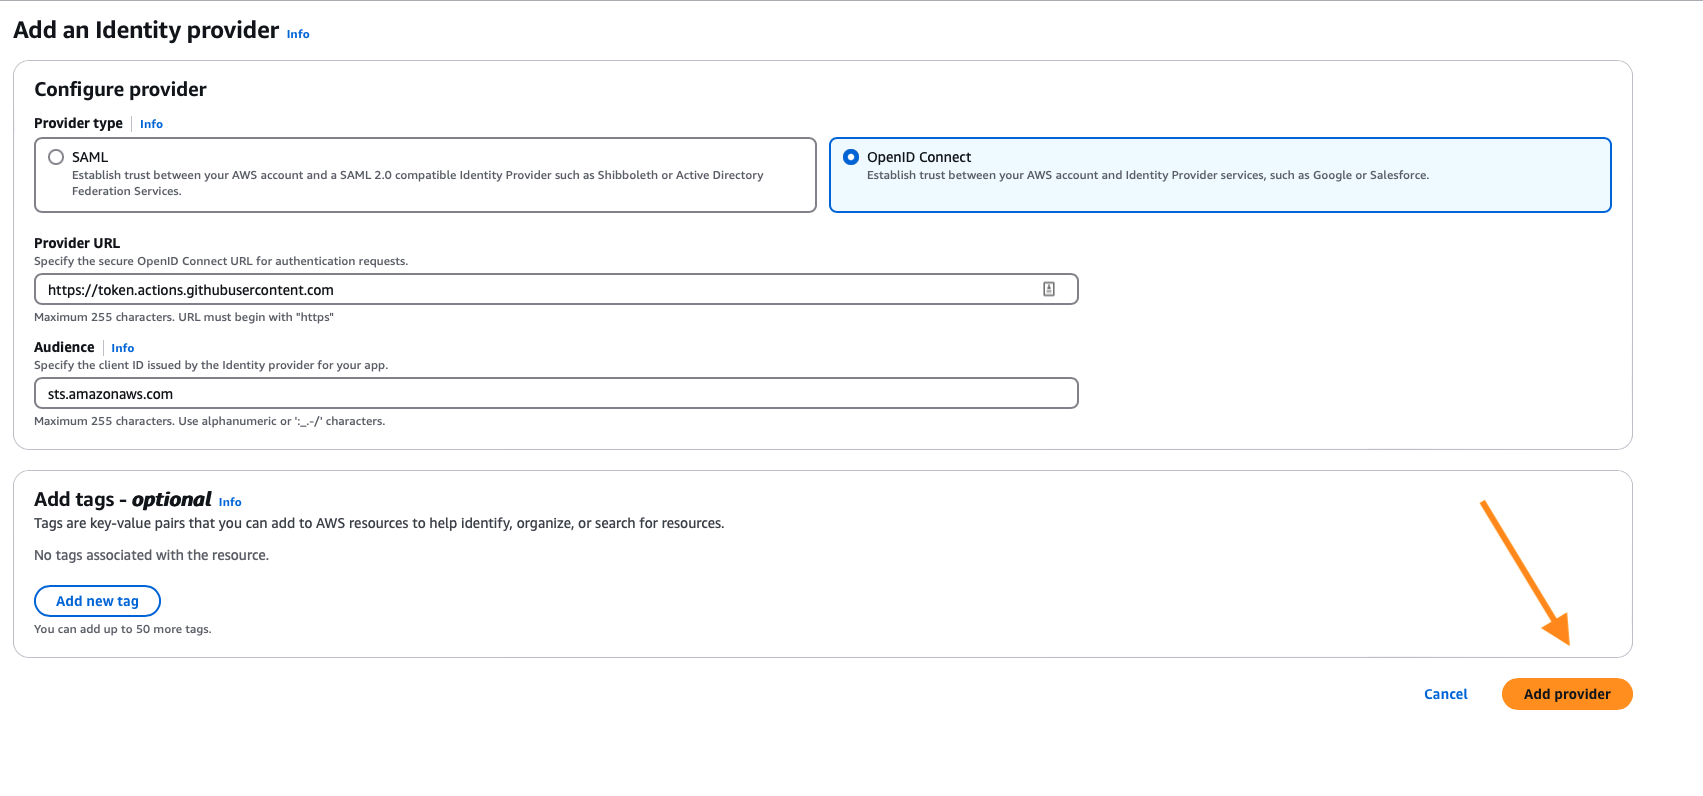
Add a GitHub OIDC Identity Provider in AWS IAM
Go to the AWS Console > IAM > Identity Providers > Add provider.
- Provider type: OpenID Connect
- Provider Url: https://token.actions.githubusercontent.com
- Audience: sts.amazonaws.com
Next Add provider.
Create an IAM Role for GitHub Actions OIDC
Copy the Identity provider role arn.
Select the newly your newly created provider on the Identity providers screen

Click Assign a role
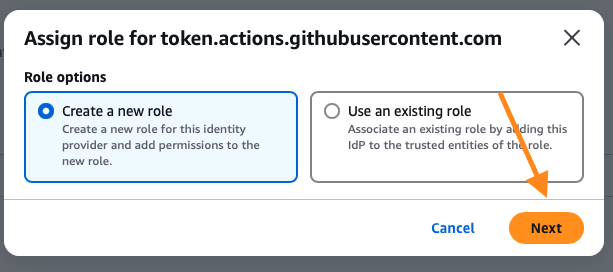
- Role options: Create a new role

Trusted entity type: Custom trust policy
Click next
GitHub organization
Replace <AWS_ACCOUNT_ID>,
{
  "Version": "2012-10-17",
  "Statement": [
    {
      "Effect": "Allow",
      "Principal": {
        "Federated": "arn:aws:iam::<AWS_ACCOUNT_ID>:oidc-provider/token.actions.githubusercontent.com"
      },
      "Action": "sts:AssumeRoleWithWebIdentity",
      "Condition": {
        "StringEquals": {
          "token.actions.githubusercontent.com:aud": "sts.amazonaws.com"
        },
        "StringLike": {
          "token.actions.githubusercontent.com:sub": "repo:<OWNER>/<REPO>:ref:refs/heads/<BRANCH>"
        }
      }
    }
  ]
}
Than click Next
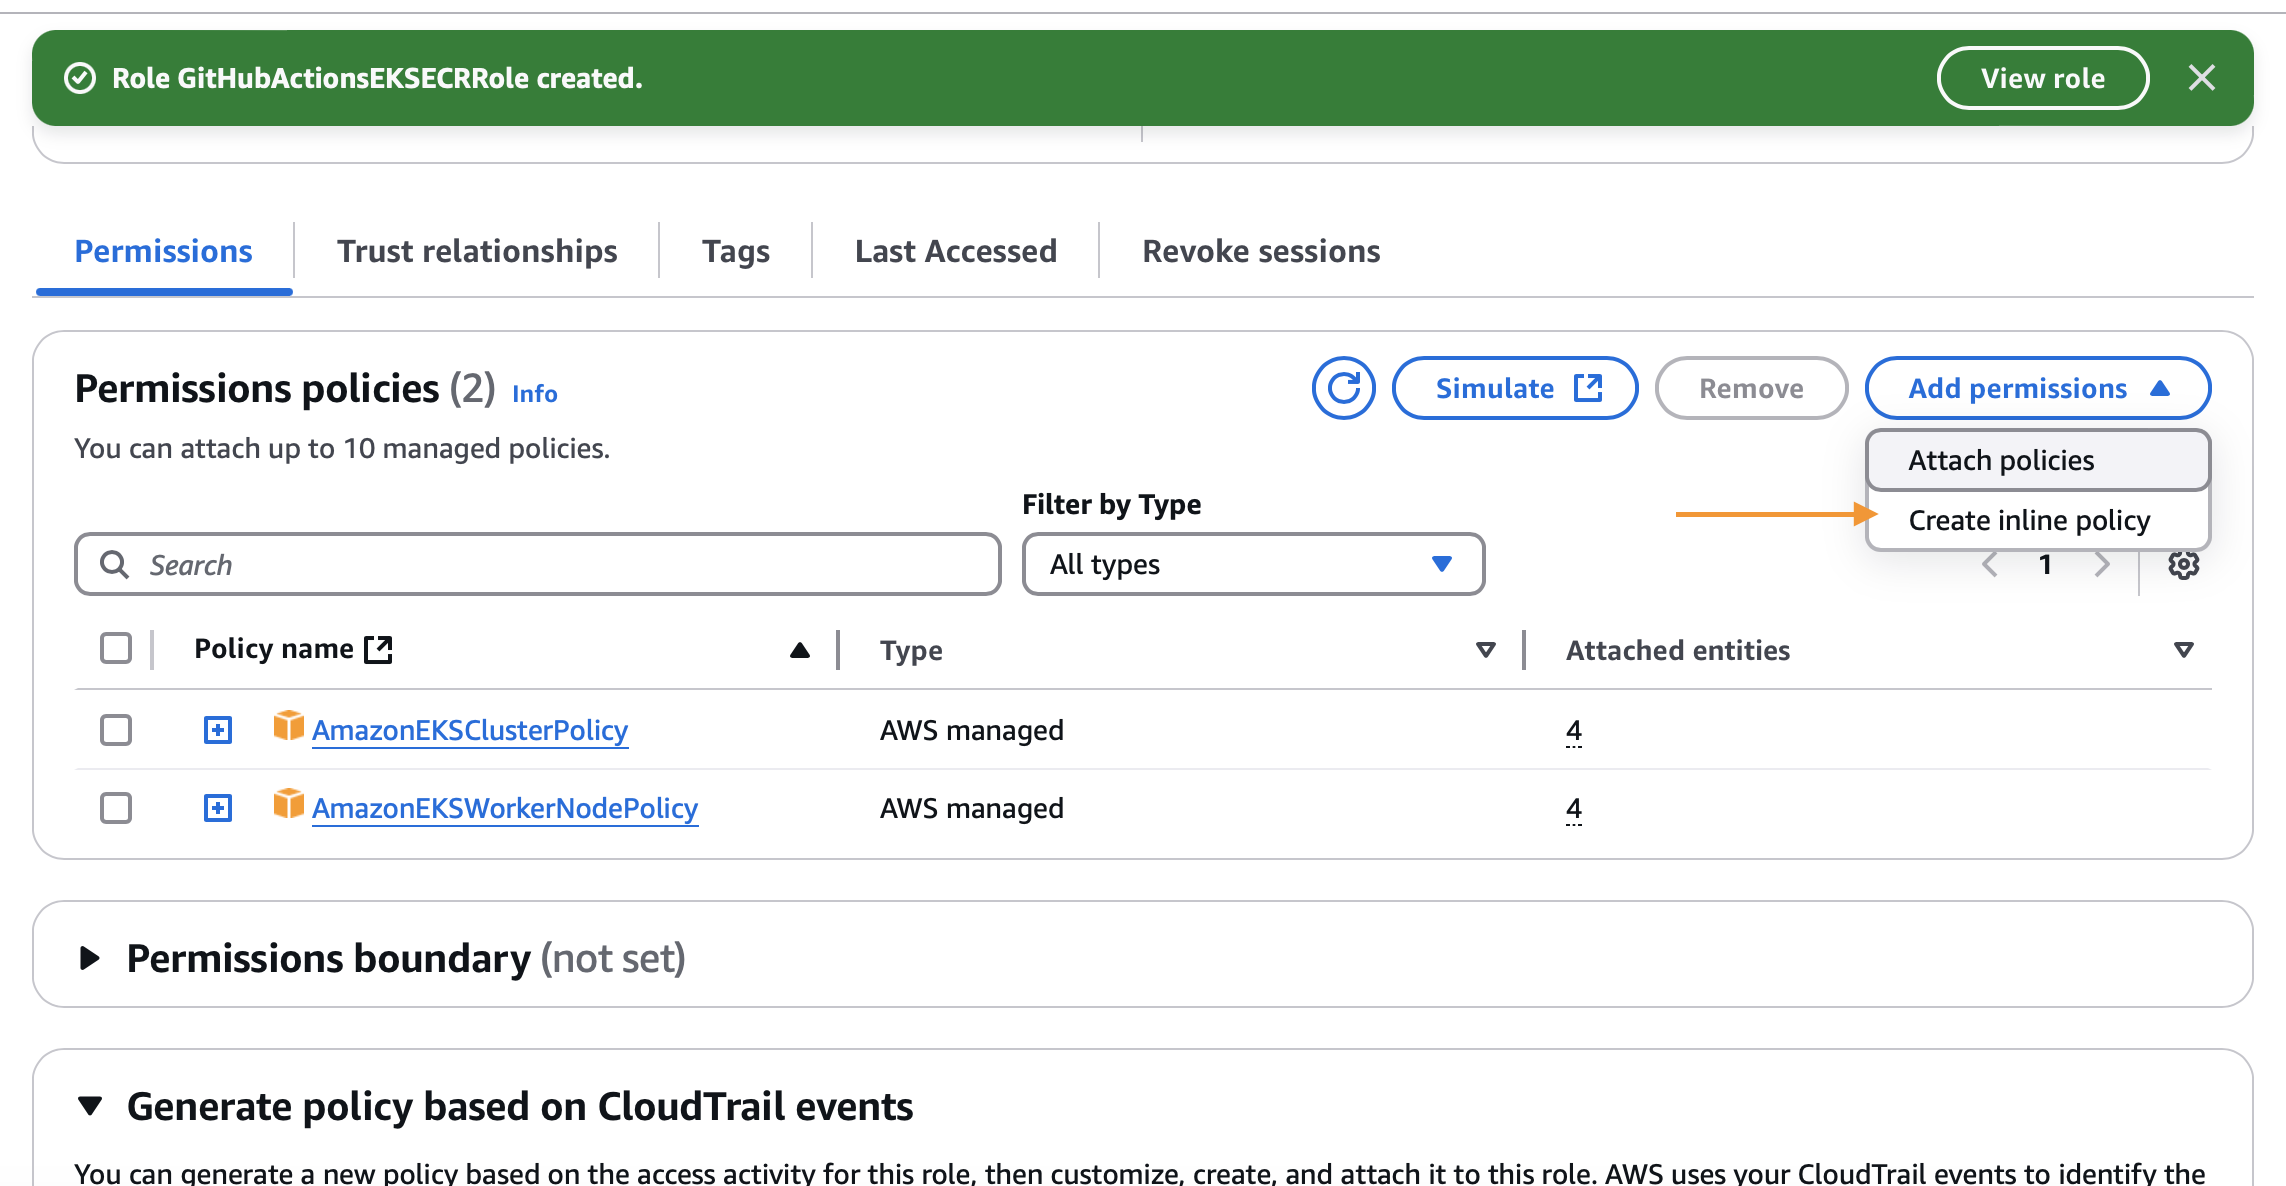
Attach the policies below:
- AmazonEKSClusterPolicy
- AmazonEKSWorkerNodePolicy
Than click Next
Name the role, e.g. GitHubActionsEKSECRRole
Next click Create Role
Access the newly created role.
Add Inline Policy for ECR:
Add Permissions > Create Inline policy > Use the JSON editor
Copy the code below to restrict to you repository ARN, as shown below.
{
  "Version": "2012-10-17",
  "Statement": [
    {
      "Effect": "Allow",
      "Action": [
        "ecr:GetAuthorizationToken"
      ],
      "Resource": "*"
    },
    {
      "Effect": "Allow",
      "Action": [
        "ecr:BatchCheckLayerAvailability",
        "ecr:GetDownloadUrlForLayer",
        "ecr:GetRepositoryPolicy",
        "ecr:DescribeRepositories",
        "ecr:ListImages",
        "ecr:DescribeImages",
        "ecr:BatchGetImage",
        "ecr:GetLifecyclePolicy",
        "ecr:GetLifecyclePolicyPreview",
        "ecr:ListTagsForResource",
        "ecr:DescribeImageScanFindings",
        "ecr:InitiateLayerUpload",
        "ecr:UploadLayerPart",
        "ecr:CompleteLayerUpload",
        "ecr:PutImage"
      ],
      "Resource": "arn:aws:ecr:<AWS-REGION>:<ACCOUNT-ID>:repository/<REPO-NAME>"
    }
  ]
}
Give your role policy a name; GitHubActionsEKSECRRole
Click Next
Instead of editing aws-auth ConfigMap, you can give this role direct EKS access:
Run the following code in your CLI.
Replace cluster-name with the name of your cluster.
"aws eks create-access-entry --cluster-name <cluster-name> --principal-arn arn:aws:iam::<AWS_ACCOUNT_ID>:role/GitHubActionsEKSECRRole --type STANDARD"Then associate the policy that allows cluster admin actions:
aws eks associate-access-policy --cluster-name <cluster-name> --principal-arn arn:aws:iam::<AWS_ACCOUNT_ID>:role/GitHubActionsEKSECRRole \
  --access-scope type=cluster --policy-arn arn:aws:eks::aws:cluster-access-policy/AmazonEKSClusterAdminPolicy
You can verify your entry:
aws eks list-access-entries --cluster-name fastapi-demoStep 5: Build the GitHub Actions CI/CD Workflow
Finally, set up your GitHub Actions workflow to build, push, and deploy automatically.
In your GitHub repo, navigate to Actions > New Workflow.


Copy the code below and replace with your information. Anything that is full capitilized and begins with a “$” is sensitive information that will not be easily shown in your code.
name: Deploy to AWS

on:
  workflow_dispatch:
  push:
    branches:
      - main

jobs:
  deploy:
    runs-on: ubuntu-latest

    permissions:
      id-token: write
      contents: read

    steps:
      - name: Checkout code
        uses: actions/checkout@v4.2.2

      - name: Configure AWS credentials
        uses: aws-actions/configure-aws-credentials@v4
        with:
          role-to-assume: ${{ secrets.AWS_ROLE_ARN }}
          role-session-name: GitHubActionsSession
          aws-region: ${{ secrets.AWS_REGION }}

      - name: Login to Amazon ECR
        id: login-ecr
        uses: aws-actions/amazon-ecr-login@v2

      - name: Build, tag, and push docker image to Amazon ECR
        env:
          REGISTRY: ${{ steps.login-ecr.outputs.registry }}
          REPOSITORY: fastapi-app # your ECR repository name
          IMAGE_TAG: ${{ github.sha }}
        run: |
          docker build -t $REGISTRY/$REPOSITORY:$IMAGE_TAG .
          docker push $REGISTRY/$REPOSITORY:$IMAGE_TAG

      - name: Update kube config
        run: aws eks update-kubeconfig --name ${{ secrets.EKS_CLUSTER_NAME }} --region ${{ secrets.AWS_REGION }}

      - name: Deploy to EKS
        env:
          ECR_REGISTRY: ${{ steps.login-ecr.outputs.registry }}
          IMAGE_TAG: ${{ github.sha }}
          EKS_CLUSTER_NAME: ${{ secrets.EKS_CLUSTER_NAME }}
        run: |
          sed -i.bak "s|DOCKER_IMAGE|$ECR_REGISTRY/$REPOSITORY:$IMAGE_TAG|g" fastapi-deploy.yaml
          kubectl apply -f fastapi-deploy.yaml
          kubectl apply -f fastapi-service.yaml
Understanding the GitHub Actions EKS Deployment Workflow
Let’s walk through our CI/CD pipeline that automates deploying applications to AWS using GitHub Actions. This workflow handles everything from building Docker images to deploying on EKS, all while maintaining security best practices.
GitHub Actions Workflow Triggers and OIDC Permissions
name: Deploy to AWS
on:
  workflow_dispatch:
  push:
    branches:
      - main
Our pipeline springs into action in two scenarios:
- When code is pushed to the main branch
- Manually through workflow_dispatch (useful for testing or one-off deployments)
The workflow needs specific permissions to interact with AWS securely:
permissions:
  id-token: write
  contents: read
These permissions enable OIDC authentication with AWS while keeping access to our GitHub repository read-only - following the principle of least privilege.
Authenticate GitHub Actions With AWS Using OIDC
- name: Configure AWS credentials
  uses: aws-actions/configure-aws-credentials@v4
  with:
    role-to-assume: ${{ secrets.AWS_ROLE_ARN }}
    role-session-name: GitHubActionsSession
    aws-region: ${{ secrets.AWS_REGION }}
This step establishes secure communication with AWS using OIDC. Instead of storing long-lived credentials, we assume an IAM role temporarily. This role grants just enough permissions to:
- Push images to ECR
- Deploy to our EKS cluster
Build and Push Docker Images to Amazon ECR
- name: Login to Amazon ECR
  id: login-ecr
  uses: aws-actions/amazon-ecr-login@v2

- name: Build, tag, and push docker image to Amazon ECR
  env:
    REGISTRY: ${{ steps.login-ecr.outputs.registry }}
    REPOSITORY: fastapi-app
    IMAGE_TAG: ${{ github.sha }}
  run: |
    docker build -t $REGISTRY/$REPOSITORY:$IMAGE_TAG .
    docker push $REGISTRY/$REPOSITORY:$IMAGE_TAG
Here’s where we handle our Docker image:
- First, we authenticate with Amazon ECR
- Then we build the image using our Dockerfile
- We tag it with the git commit SHA for version tracking
- Finally, we push it to our ECR repository
Deploy to Amazon EKS With Kubectl
- name: Update kube config
  run: aws eks update-kubeconfig --name ${{ secrets.EKS_CLUSTER_NAME }} --region ${{ secrets.AWS_REGION }}

- name: Deploy to EKS
  env:
    ECR_REGISTRY: ${{ steps.login-ecr.outputs.registry }}
    IMAGE_TAG: ${{ github.sha }}
    EKS_CLUSTER_NAME: ${{ secrets.EKS_CLUSTER_NAME }}
  run: |
    sed -i.bak "s|DOCKER_IMAGE|$ECR_REGISTRY/$REPOSITORY:$IMAGE_TAG|g" fastapi-deploy.yaml
    kubectl apply -f fastapi-deploy.yaml
    kubectl apply -f fastapi-service.yaml
The final stage deploys our application to EKS:
- We configure kubectl to communicate with our EKS cluster
- Update our Kubernetes manifests with the new image details
- Apply both the deployment and service configurations
Security Best Practices for GitHub Actions and AWS
- All sensitive values are stored as GitHub secrets
- OIDC provides secure, temporary AWS credentials
- The workflow uses specific, versioned actions to prevent supply chain attacks
- Each step follows the principle of least privilege
Remember to replace the placeholder values (anything starting with $) with your specific information when setting up this workflow.n
Store AWS Credentials as GitHub Actions Secrets
Store your AWS account details as secrets: It is good practice to not hardcode sensitive information but we still need to use it to save sensitive infornation we will be using GitHub secrets.
- Go to your repo > Settings → Secrets & Variables > Actions to add them.
- You’re going to create a New Repository Secret.

Your entries will look like this.
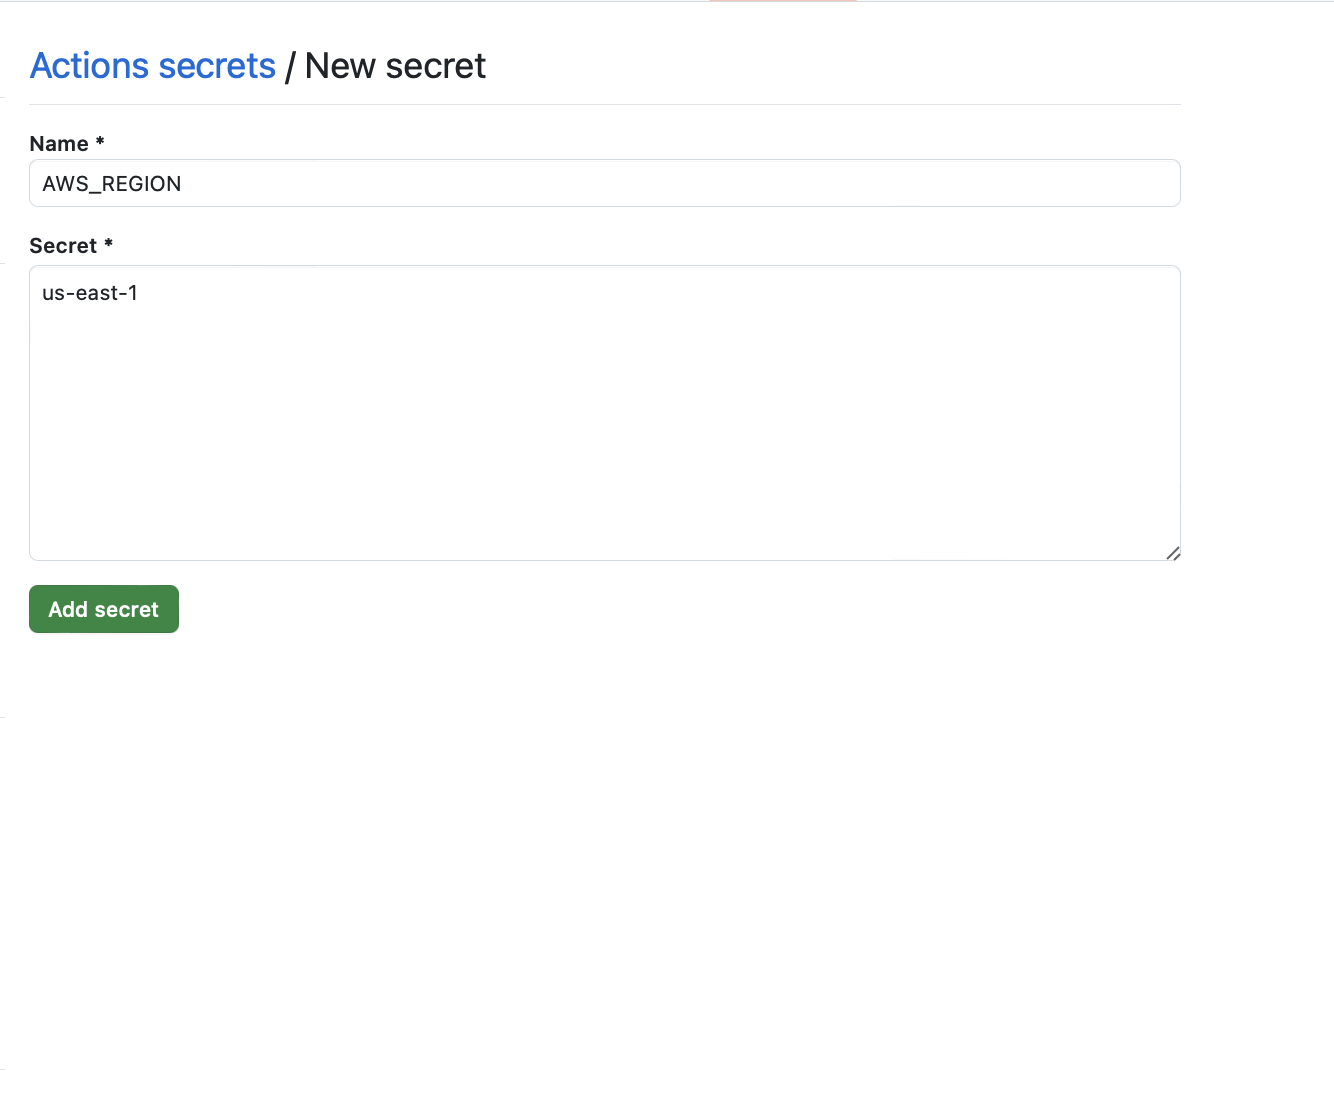
Add entries for:
AWS_REGION

AWS_ROLE_ARN # Role created

EKS_CLUSTER_NAME
Trigger the Pipeline and Verify EKS Deployment
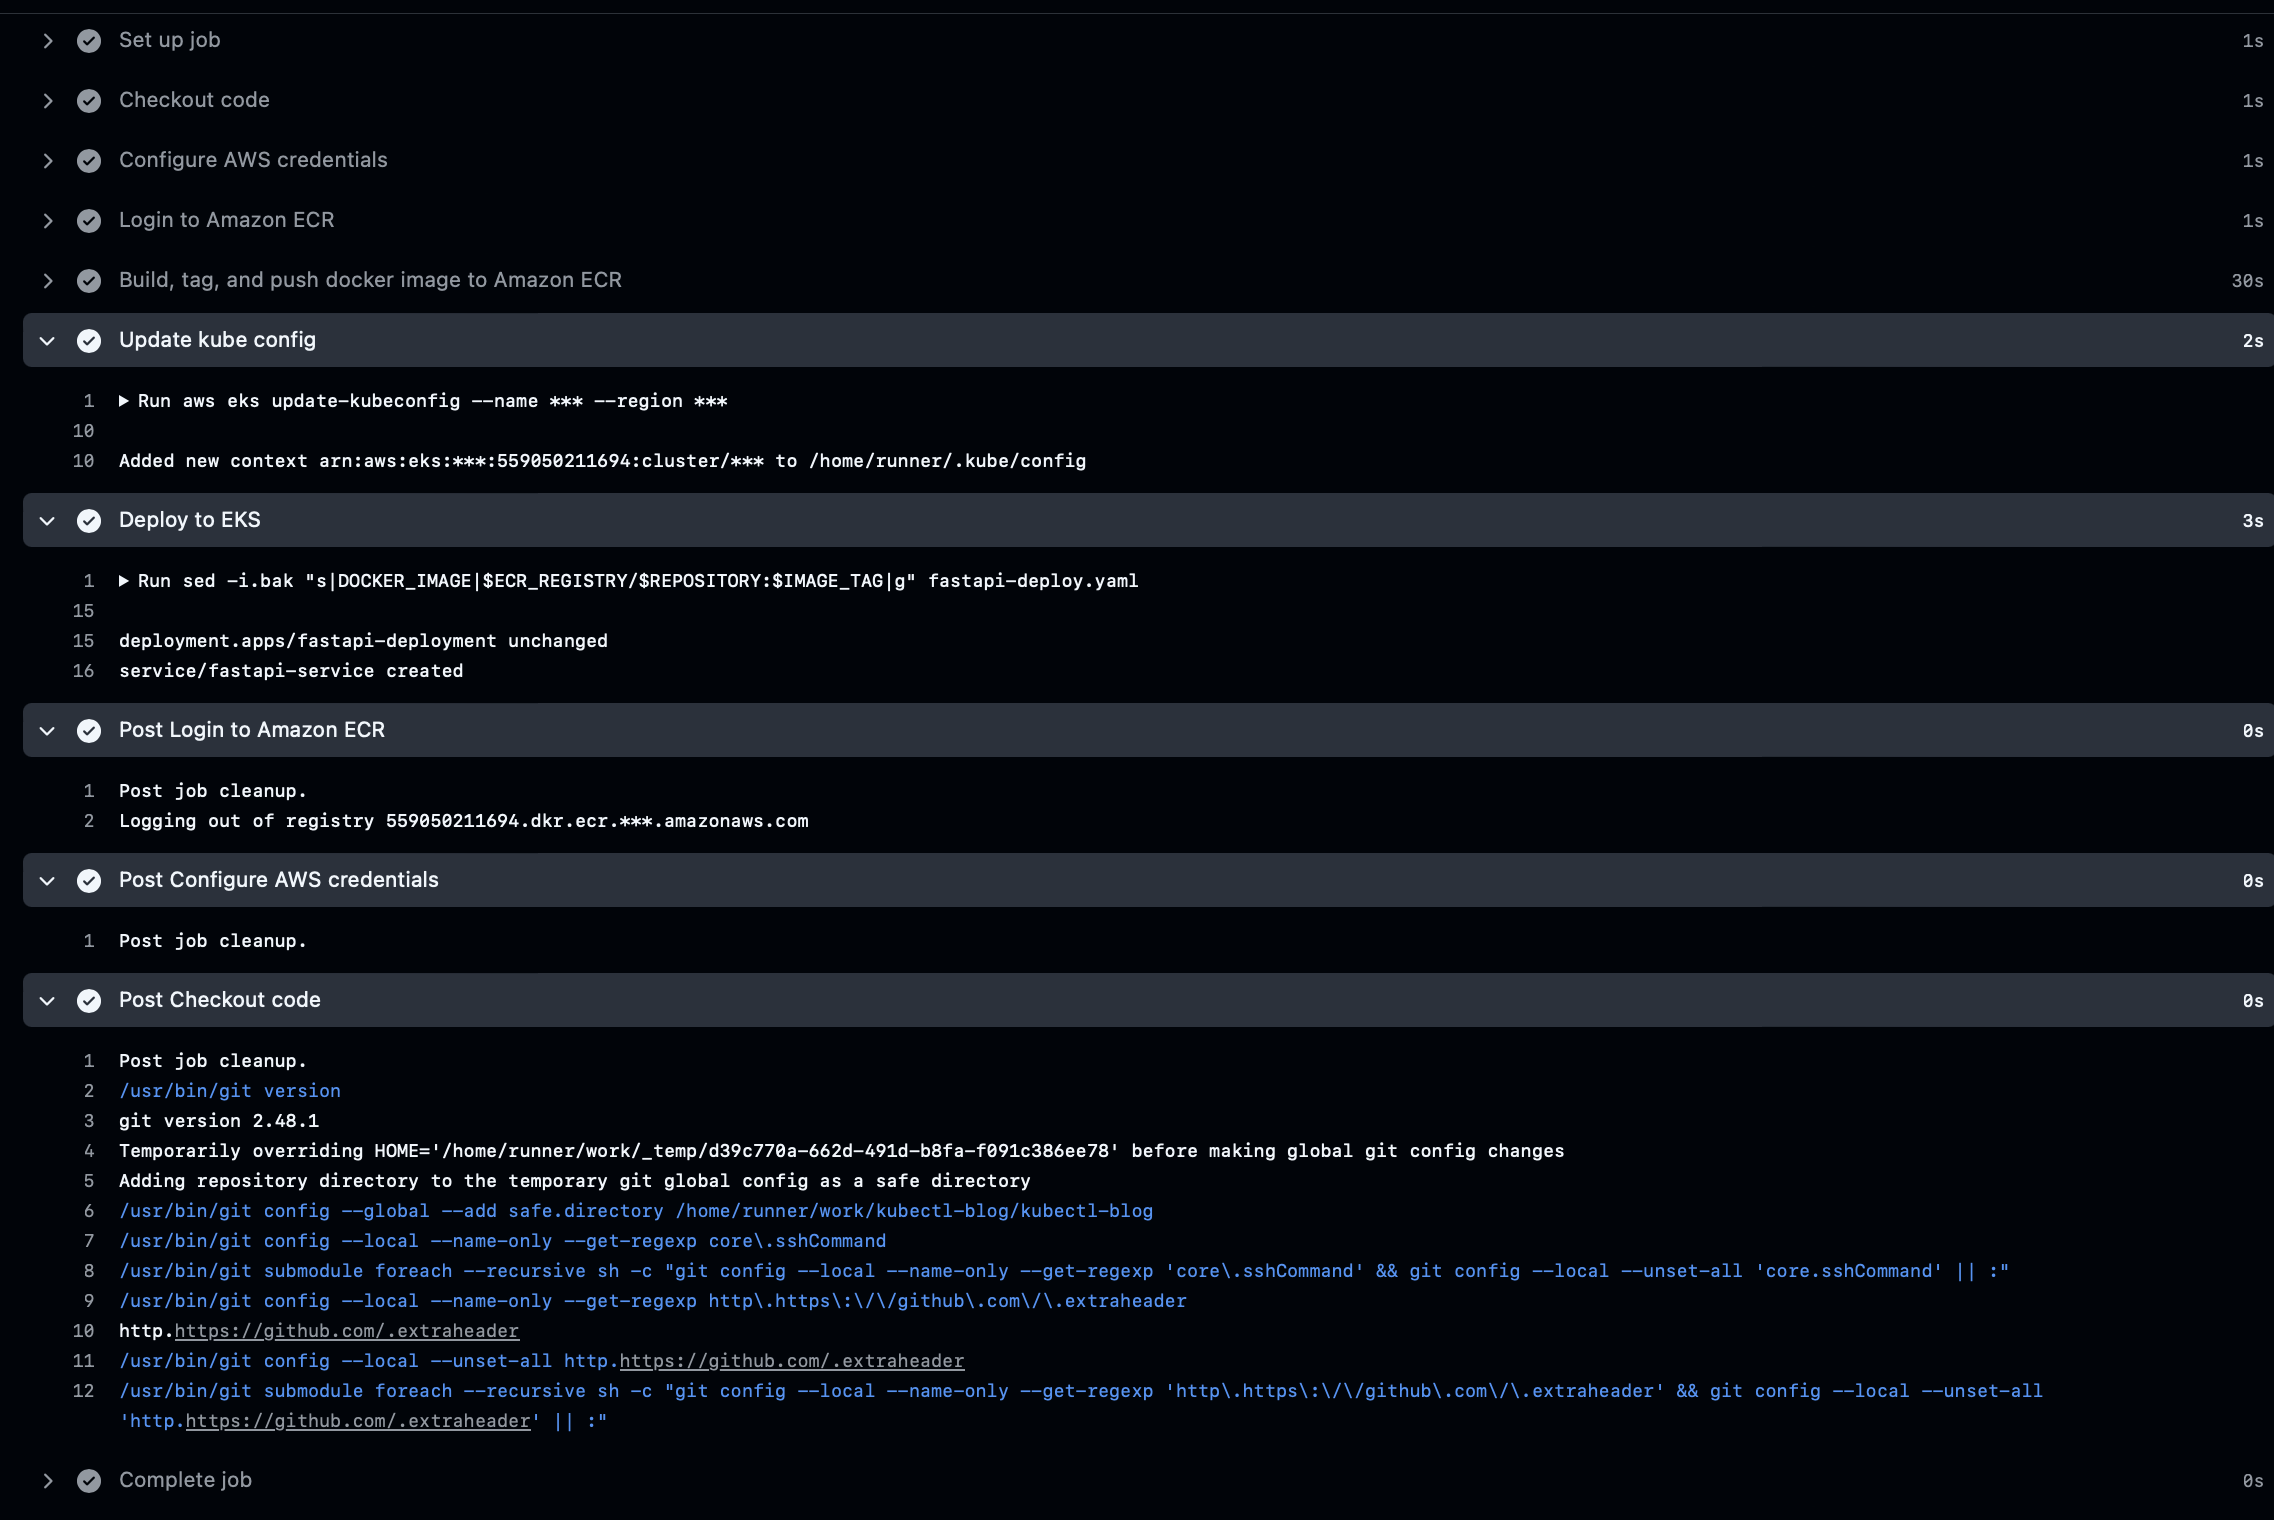
You can monitor the progress of your CI/CD pipeline by visiting the “GitHub Actions” tab in your repository. Here, you’ll see the status of each step in your workflow.
Here is what a successful deployment looks like.
IN the AWS console got to EC2 > Load balancer
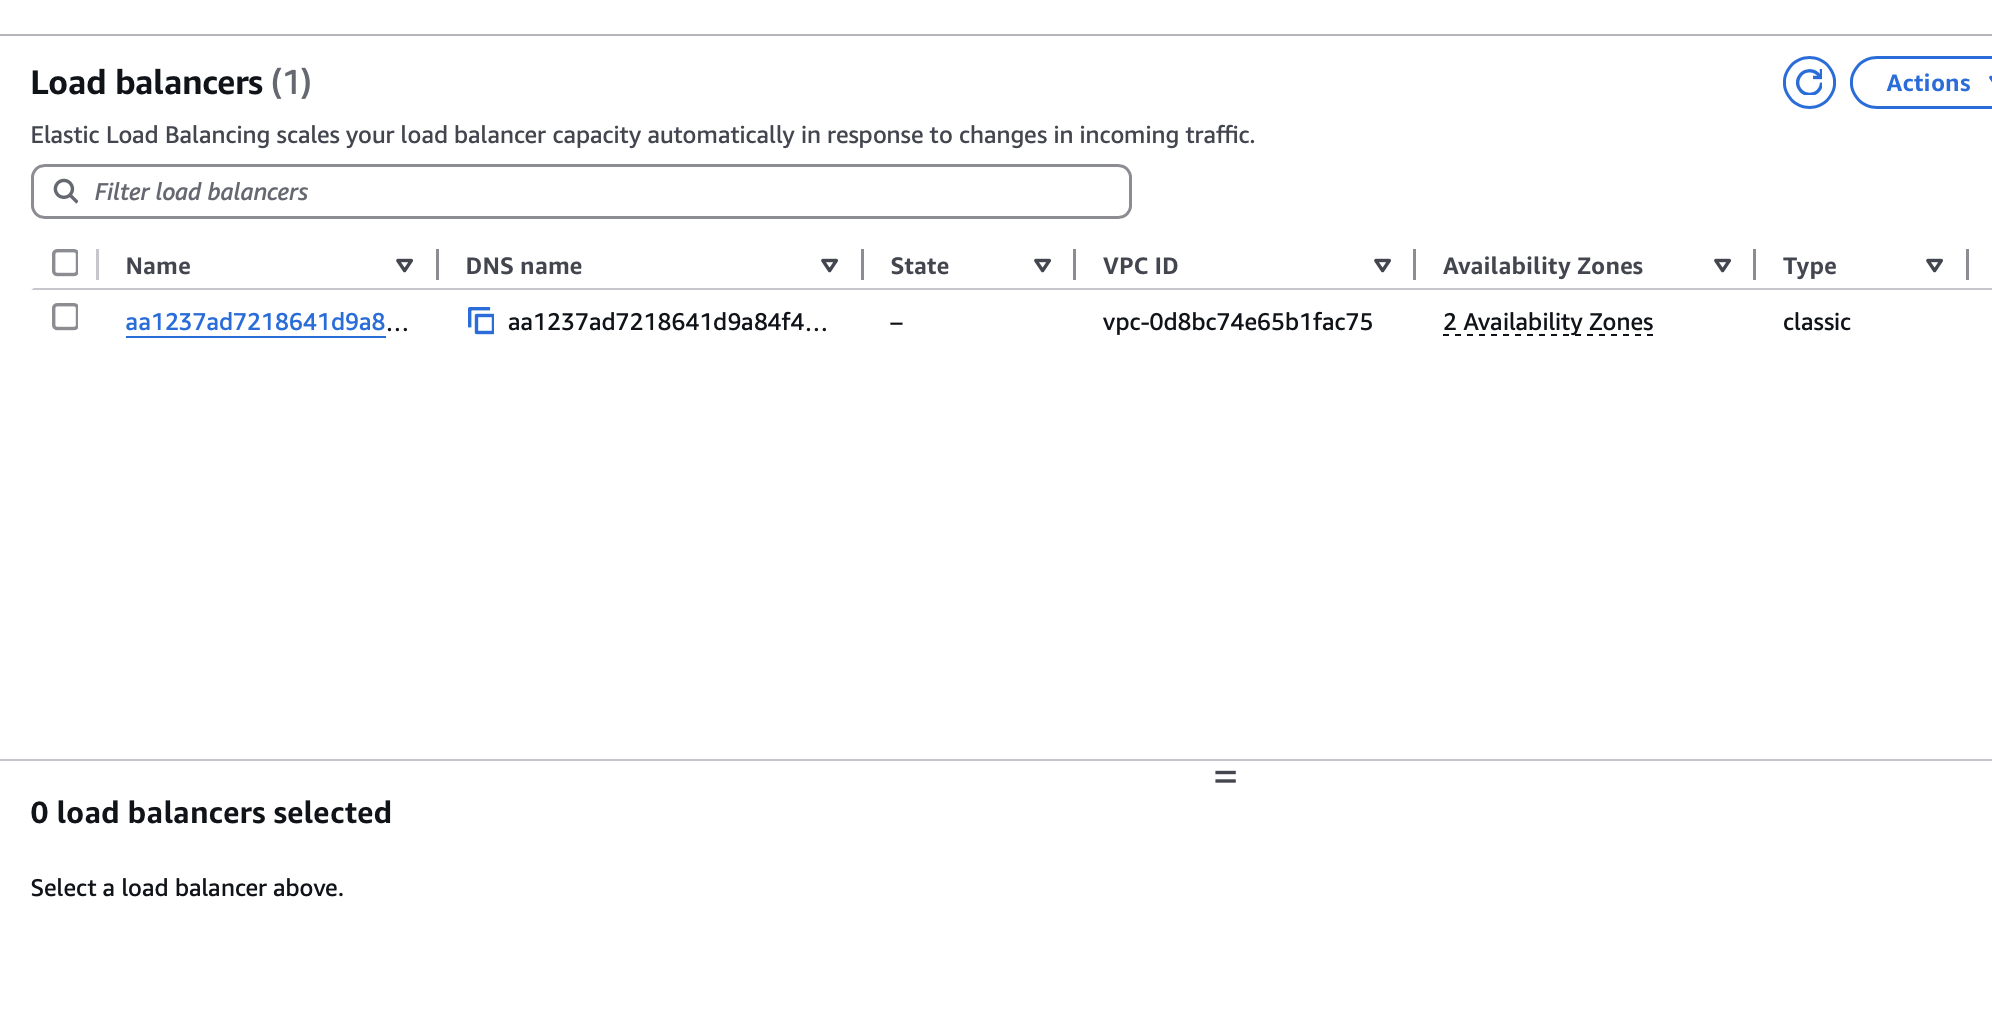
Copy the DNS name and go to port 80.
Clean Up AWS EKS Resources
When you’re done, it’s best to delete unneeded resources to avoid costs:
eksctl delete cluster --name=fastapi-demoAlso, remove or delete the ECR repository if you no longer need it.
Summary: Secure EKS Deployment With GitHub Actions OIDC
Congratulations! You’ve created a fully automated pipeline that deploys a FastAPI app to EKS, all without embedding long-lived AWS credentials in GitHub. By pairing OIDC with carefully scoped IAM policies, you maintain strong security practices while enjoying a streamlined deployment process.