How to Build an AWS Auto Scaling Group With Terraform
Terraform Auto Scaling Group Architecture Overview
I designed and implemented a highly available, fault-tolerant auto-scaling infrastructure using Terraform. The architecture spans three Availability Zones and includes both public and private subnets, demonstrating real-world security and scalability practices.
Why Use AWS Auto Scaling Groups in Production
In today’s dynamic digital landscape, applications need to adapt to changing demands while maintaining security and cost efficiency. This infrastructure addresses several critical business needs:
-
Handling Traffic Spikes
- Manages unpredictable traffic from marketing campaigns
- Adapts to product launches and seasonal events
- Maintains performance during peak loads
-
Cost Management
- Dynamically scales resources based on demand
- Prevents over-provisioning during low-traffic periods
- Optimizes cloud spending without sacrificing performance
-
High Availability and Reliability
- Distributes load across multiple instances
- Ensures seamless failover capabilities
- Minimizes downtime through redundancy
-
Enhanced User Experience
- Maintains consistent performance during traffic surges
- Ensures responsive application behavior
- Supports customer satisfaction and retention
-
Future-Proof Scalability
- Provides foundation for business growth
- Adapts to increasing traffic demands
- Requires no significant architectural changes
-
Security-First Design
- Places web servers in private subnets
- Restricts direct internet access
- Implements defense-in-depth through ALB
AWS Auto Scaling Infrastructure With ALB and VPC
How AWS Auto Scaling Triggers EC2 Instance Creation
Creating the Auto Scaling Architecture With Terraform
CPU Usage High (>70%) → Auto Scaling Group → Uses Launch Template → Creates New EC2 in Private Subnet
ALB to EC2 Traffic Flow in Private Subnets
- Internet traffic → ALB (public subnet) → Target Group → EC2 instances (private subnets)
- Health checks ensure traffic only routes to healthy instances
- Auto scaling maintains service availability based on demand
Terraform Implementation Process
Before deploying our infrastructure, we need to set up our AWS credentials and understand our module structure.
Configuring AWS Credentials for Terraform
First, configure your AWS credentials:
# Set your AWS profile
"export AWS_PROFILE=my-profile"

# Verify your account access
"aws sts get-caller-identity"
# Note: You'll need the account ID for the monitoring configuration
Terraform Workflow:
Our implementation follows this systematic approach:
- Write each module
- Validate module configuration
- Plan and review changes
- Repeat until completion
- Apply final configuration
Terraform Init, Validate, and Plan
# Initialize Terraform working directory
terraform init

# Validate module syntax and configuration
terraform validate

# Review planned changes
terraform plan
Terraform Root Module Configuration
Our root module orchestrates all components:
terraform {
  required_providers {
    aws = {
      source  = "hashicorp/aws"
      version = "~> 5.0"
    }
  }
}

# Configure the AWS Provider
provider "aws" {
  region = var.aws_region
  profile = var.aws_profile #profile name
}

module "vpc" {
  source = "./modules/vpc"

  project_name = var.project_name
}

module "launch_template" {
  source = "./modules/launch-template"
  project_name = var.project_name
  vpc_id = module.vpc.vpc_id
}

module "alb" {
  source = "./modules/alb"
  project_name = var.project_name
  vpc_id = module.vpc.vpc_id
  public_subnet_ids = module.vpc.public_subnet_ids
  alb_security_groups_id = module.launch_template.alb_security_groups_id
}

module "asg" {
  source = "./modules/asg"
  project_name = var.project_name
  private_subnet_ids = module.vpc.private_subnet_ids
  launch_template_id = module.launch_template.launch_template_id
  launch_template_version = module.launch_template.launch_template_version
  lb_target_group_arn = module.alb.lb_target_group_arn
}

module "monitoring" {
  source = "./modules/monitoring"
  project_name = var.project_name
  autoscaling_group_name = module.asg.autoscaling_group_name
  autoscaling_policy_dwn_arn = module.asg.autoscaling_policy_dwn_arn
  account-id = var.account-id
  autoscaling_policy_up_arn = module.asg.autoscaling_policy_up_arn
  notification_email = var.notification_email
}
Key Features:
- Modular Design
- Each component is a separate module
- Clear dependency chain
- Easy to maintain and update
- Resource Flow
- VPC provides network foundation
- Launch template defines instance configuration
- ALB handles traffic distribution
- ASG manages scaling
- Monitoring provides oversight
- Output Configuration
output "alb_dns_name" {
  value = module.alb.alb_dns_name
}
This output provides the ALB DNS name for accessing our application.
Terraform VPC Module With Public and Private Subnets
The first major component is creating a VPC module with public and private subnets.
VPC and Availability Zone Variables
variable "vpc_cidr" {
  type = string
  description = "CIDR block for VPC"
  default = "10.0.0.0/16"
}

variable "azs" {
  type = list(string)
  description = "availabilty zones"
  default = ["us-east-1a", "us-east-1b", "us-east-1c"]
}
Creating the AWS VPC With Terraform
# Create vpc
resource "aws_vpc" "main" {
    cidr_block = var.vpc_cidr
    enable_dns_support = true
    enable_dns_hostnames = true
}
The VPC is configured with:
- CIDR block 10.0.0.0/16
- DNS hostname support enabled
- DNS resolution enabled
Public Subnets, Internet Gateway, and Route Tables
# Create public subnets
resource "aws_subnet" "public" {
  count = length(var.azs)
  vpc_id     = aws_vpc.main.id
  cidr_block = "10.0.${count.index + 1}.0/24"
  availability_zone = var.azs[count.index]

  map_public_ip_on_launch = true
}

# internet gateway for public subnets
resource "aws_internet_gateway" "main" {
    vpc_id = aws_vpc.main.id

# route table for public subnets
resource "aws_route_table" "public" {
  vpc_id = aws_vpc.main.id

  route {
    cidr_block = "0.0.0.0/0"
    gateway_id = aws_internet_gateway.main.id
  }

#
resource "aws_route_table_association" "public" {
  count = length(var.azs)
  subnet_id      = aws_subnet.public[count.index].id
  route_table_id = aws_route_table.public.id
}
This creates:
- Three public subnets across different AZs (10.0.1.0/24, 10.0.2.0/24, 10.0.3.0/24)
- Enabled auto-assign public IP setting for these subnets
- Attached an Internet Gateway to enable direct internet connectivity
- Configured a public route table with a route to 0.0.0.0/0 via the IGW
Private Subnets With NAT Gateway for EC2 Instances
# create private subnets
resource "aws_subnet" "private" {
  count = length(var.azs)
  vpc_id     = aws_vpc.main.id
  cidr_block = "10.0.${count.index + 10}.0/24"
  availability_zone = var.azs[count.index]

  tags = {
    Name = "${var.project_name}-private-${count.index + 1}"
  }
}

resource "aws_eip" "nat" {
  domain = "vpc"

# nate gateway for private subnets internet access
resource "aws_nat_gateway" "main" {
  allocation_id = aws_eip.nat.id
  subnet_id = aws_subnet.public[0].id

    depends_on = [ aws_internet_gateway.main ]
}

# route table for private subnets
resource "aws_route_table" "private" {
  vpc_id = aws_vpc.main.id

  route {
    cidr_block = "0.0.0.0/0"
    nat_gateway_id = aws_nat_gateway.main.id
  }

resource "aws_route_table_association" "private" {
  count = length(var.azs)
  subnet_id      = aws_subnet.private[count.index].id
  route_table_id = aws_route_table.private.id
}
This implements:
- Three private subnets (10.0.10.0/24, 10.0.11.0/24, 10.0.12.0/24)
- NAT Gateway in the first public subnet
- Private route table routing through NAT Gateway
- No public IP assignment
The architecture ensures reliability through:
- Multi-AZ deployment for redundancy
- Strategically placed NAT Gateway
- Paired public/private subnets in each AZ
- Optimized AWS data transfer paths
EC2 Launch Template and Security Group Configuration
This module defines our instance configurations and security boundaries. I use a security-first approach with separate security groups for the ALB and EC2 instances.
AWS Security Groups for ALB and EC2
- EC2 Security Group (Private Subnet)
# restrict outgoing traffic to alb onlyy
resource "aws_security_group" "ec2" {
  name = "${var.project_name}-ec2-sg"
  vpc_id = var.vpc_id

  lifecycle {
    create_before_destroy = true
  }
}

# Allow only Alb traffic
resource "aws_security_group_rule" "allow_alb" {
  type = "ingress"
  security_group_id = aws_security_group.ec2.id
  source_security_group_id = aws_security_group.alb.id
  from_port         = 80
  protocol       = "tcp"
  to_port           = 80

}

resource "aws_security_group_rule" "allow_ec2_egress" {
  type = "egress"
  security_group_id = aws_security_group.ec2.id
  from_port         = 0
  protocol       = "-1"
  to_port           = 0
  cidr_blocks = [ "0.0.0.0/0" ]
}
Security measures:
- Restricts inbound access to ALB traffic only
- Allows outbound internet access via NAT Gateway
- Ensures instances remain private and secure
- ALB Security Group (Public Subnet)
# Alb security group
resource "aws_security_group" "alb" {
  name = "${var.project_name}-alb-sg"
  vpc_id = var.vpc_id

  lifecycle {
    create_before_destroy = true
  }
}

resource "aws_security_group_rule" "allow_alb_ingress" {
  type = "ingress"
  security_group_id = aws_security_group.alb.id
  cidr_blocks         = ["0.0.0.0/0"]
  from_port         = 80
  protocol       = "tcp"
  to_port           = 80
}

resource "aws_security_group_rule" "allow_alb_egress" {
  type = "egress"
  security_group_id = aws_security_group.alb.id
  cidr_blocks          = ["0.0.0.0/0"]
  to_port = 0
  from_port = 0
  protocol       = "-1"
}
Features:
- Accepts HTTP traffic from internet
- Routes traffic to EC2 instances
- Acts as public entry point
AWS Launch Template With Ubuntu AMI and User Data
The launch template defines the EC2 instance configuration:
resource "aws_launch_template" "main" {
  name_prefix   = "${var.project_name}-"

  image_id = data.aws_ami.ubuntu.id

  instance_type = "t2.micro"


  network_interfaces {
    associate_public_ip_address = false
    security_groups = [aws_security_group.ec2.id]
  }


  tag_specifications {
    resource_type = "instance"

  lifecycle {
    create_before_destroy = true
  }

  monitoring {
    enabled = "true"
  }

  user_data = filebase64("${abspath(path.root)}/scripts/ec2.sh")

  iam_instance_profile {
    name = aws_iam_instance_profile.ec2_profile.name
  }
}

data "aws_ami" "ubuntu" {
  most_recent = true
  owners = [ "099720109477" ]

  filter {
    name = "name"
    values = [ "ubuntu/images/hvm-ssd/ubuntu-jammy-22.04-amd64-server-*" ]
  }

  filter {
    name = "virtualization-type"
    values = [ "hvm" ]
  }

}
Key Configurations:
- t2.micro for cost efficiency
- Uses Ubuntu AMI for consistency
- Disabled public IPs for security
- Enables detailed monitoring
- Includes user data script for setup
IAM Role and Instance Profile for EC2
Implements least-privilege access:
resource "aws_iam_role" "ec2_role" {
  name = "${var.project_name}-ec2-role"

  # Terraform's "jsonencode" function converts a
  # Terraform expression result to valid JSON syntax.
  assume_role_policy = jsonencode({
    Version = "2012-10-17"
    Statement = [
      {
        Action = "sts:AssumeRole"
        Effect = "Allow"
        Sid    = ""
        Principal = {
          Service = "ec2.amazonaws.com"
        }
      },
    ]
  })
}

resource "aws_iam_instance_profile" "ec2_profile" {
  name = "${var.project_name}-ec2-profile"
  role = aws_iam_role.ec2_role.name
}


resource "aws_iam_role_policy" "ec2_custom_policy" {
  name = "${var.project_name}-ec2-custom-policy"
  role = aws_iam_role.ec2_role.name

  policy = jsonencode({
    Version = "2012-10-17"
    Statement = [
      {
        Effect = "Allow"
        Action = [
          "elasticloadbalancing:Describe*",
          "elasticloadbalancing:DeregisterTargets",
          "elasticloadbalancing:RegisterTargets"
        ]
        Resource = "*"
      },
      {
        Effect = "Allow"
        Action = [
          "ec2:DescribeInstances",
          "ec2:DescribeTags"
        ]
        Resource = "*"
      }
    ]
  })
}
Permissions granted:
- Load balancer registration
- Instance metadata access
- Basic EC2 operations
Application Load Balancer and Auto Scaling Group Setup
This section configures our application’s load balancing and auto scaling capabilities.
Creating an Application Load Balancer With Terraform
First, I created the Application Load Balancer in our public subnets:
resource "aws_lb" "main" {
  name               = "${var.project_name}-alb"
  internal           = false
  load_balancer_type = "application"
  security_groups    = [var.alb_security_groups_id]
  subnets            = var.public_subnet_ids

  enable_deletion_protection = false
}
Key Features:
- Deployed in public subnets for internet accessibility
- Internet-facing for public access
- Uses security group allowing HTTP traffic
ALB Target Group With Health Check Configuration
# create target group
resource "aws_lb_target_group" "main" {
  name        = "${var.project_name}-alb-tg"
  target_type = "instance"
  port        = 80
  protocol    = "HTTP"
  vpc_id      = var.vpc_id

  health_check {
    enabled             = true
    healthy_threshold   = 2
    interval            = 30
    matcher            = "200"
    path               = "/"
    port               = "traffic-port"
    timeout            = 5
    unhealthy_threshold = 2
  }
}
Created target group with health checks:
- Path: ”/” for root endpoint testing
- 30-second check intervals
- Healthy threshold: 2 successful checks
- Unhealthy threshold: 2 failed checks
# create alb listener
resource "aws_lb_listener" "http" {
  load_balancer_arn = aws_lb.main.arn
  port = 80
  protocol = "HTTP"

  default_action {
    type = "forward"
    target_group_arn = aws_lb_target_group.main.arn
  }
}
Configured HTTP listener on port 80 to forward traffic to target group
Auto Scaling Group With Scaling Policies
The ASG manages our EC2 instances:
resource "aws_autoscaling_group" "main" {
  name                      = "${var.project_name}-asg"
  max_size                  = 9
  min_size                  = 3
  desired_capacity          = 3
  health_check_type         = "ELB"
  health_check_grace_period = 300
  vpc_zone_identifier       = var.private_subnet_ids
  target_group_arns  = [var.lb_target_group_arn]


  launch_template {
    id      = var.launch_template_id
    version = var.launch_template_version
  }
  # var.lb_target_group_arn

  tag {
    key                 = "Name"
    value               = "${var.project_name}-asg-instance"
    propagate_at_launch = true
  }

}
Configuration Details:
- Placed EC2 instances in private subnets for enhanced security
- Capacity settings:
- Minimum: 3 instances
- Maximum: 9 instances
- Initial : 3 instances
- Distribution:
- Spread across multiple availability zones
- Integrated with ALB target group for load distribution
- Scaling Policies:
resource "aws_autoscaling_policy" "scaleUp" {
  name                   = "${var.project_name}-asg-up"
  scaling_adjustment     = 1
  adjustment_type        = "ChangeInCapacity"
  cooldown               = 300
  autoscaling_group_name = aws_autoscaling_group.main.name

}

resource "aws_autoscaling_policy" "scaleDown" {
  name                   = "${var.project_name}-asg-down"
  scaling_adjustment     = -1
  adjustment_type        = "ChangeInCapacity"
  cooldown               = 300
  autoscaling_group_name = aws_autoscaling_group.main.name

}- Scales up by 1 instance when triggered
- Scales down by 1 instance when triggered
- 5-minute cooldown between scaling actions
- Matches with CloudWatch alarms for CPU metrics
CloudWatch Monitoring and SNS Alerts for Auto Scaling
The monitoring strategy combines CloudWatch alarms with SNS notifications to provide comprehensive oversight of the auto-scaling infrastructure.
CloudWatch CPU Utilization Alarms for Scale-Up and Scale-Down
resource "aws_cloudwatch_metric_alarm" "high_cpu" {
  alarm_name          = "${var.project_name}-highCpu-alarm"
  comparison_operator = "GreaterThanThreshold"
  evaluation_periods  = 1
  metric_name         = "CPUUtilization"
  namespace           = "AWS/EC2"
  period              = 120
  statistic           = "Average"
  threshold           = 70

  dimensions = {
    AutoScalingGroupName = var.autoscaling_group_name
  }

  alarm_description = "Scale out if CPU > 70%"
  alarm_actions     = [var.autoscaling_policy_up_arn]
}

resource "aws_cloudwatch_metric_alarm" "low_cpu" {
  alarm_name          = "${var.project_name}-lowCpu-alarm"
  comparison_operator = "LessThanThreshold"
  evaluation_periods  = 1
  metric_name         = "CPUUtilization"
  namespace           = "AWS/EC2"
  period              = 120
  statistic           = "Average"
  threshold           = 20

  dimensions = {
    AutoScalingGroupName = var.autoscaling_group_name
  }

  alarm_description = "Scale out if CPU > 70%"
  alarm_actions     = [var.autoscaling_policy_dwn_arn]
}
Configuration Details:
- Scale-Out Alarm (High CPU)
- Triggers when CPU > 70%
- Evaluates every 120 seconds
- Initiates immediate scaling
- Scale-In Alarm (Low CPU)
- Triggers when CPU < 20%
- Same evaluation period
- Reduces capacity when load decreases
SNS Email Notifications for Auto Scaling Events
- SNS Topic Setup
resource "aws_sns_topic" "main" {
  name = "${var.project_name}-sns-topic"
}

resource "aws_sns_topic_policy" "policy" {
  arn = aws_sns_topic.main.arn

  policy = data.aws_iam_policy_document.sns_topic_policy.json
}

data "aws_iam_policy_document" "sns_topic_policy" {
  policy_id = "__default_policy_ID"

  statement {
    actions = [
      "SNS:Subscribe",
      "SNS:SetTopicAttributes",
      "SNS:RemovePermission",
      "SNS:Receive",
      "SNS:Publish",
      "SNS:ListSubscriptionsByTopic",
      "SNS:GetTopicAttributes",
      "SNS:DeleteTopic",
      "SNS:AddPermission",
    ]

    condition {
      test     = "StringEquals"
      variable = "AWS:SourceOwner"

      values = [
        var.account-id,
      ]
    }

    effect = "Allow"

    principals {
      type        = "AWS"
      identifiers = ["*"]
    }

    resources = [aws_sns_topic.main.arn]

    sid = "__default_statement_ID"
  }
}

resource "aws_autoscaling_notification" "asg_notifications" {
  group_names = [var.autoscaling_group_name]
  topic_arn   = aws_sns_topic.main.arn

  notifications = [
    "autoscaling:EC2_INSTANCE_LAUNCH",
    "autoscaling:EC2_INSTANCE_TERMINATE",
    "autoscaling:EC2_INSTANCE_LAUNCH_ERROR",
    "autoscaling:EC2_INSTANCE_TERMINATE_ERROR"
  ]
}- Email Alert Configuration
resource "aws_sns_topic_subscription" "email" {
  topic_arn = aws_sns_topic.main.arn
  protocol  = "email"
  endpoint  = var.notification_email
}
Monitoring Coverage:
- Auto Scaling Events
- Instance launches
- Instance terminations
- Scaling errors
- Operation failures
- Real-Time Notifications
- Scale-out actions
- Scale-in actions
- Infrastructure health alerts
- Error conditions
Troubleshooting AWS Auto Scaling Deployment Issues
How to Fix 502 Bad Gateway Error on AWS ALB
When attempting to access the Application Load Balancer’s DNS name, I encountered a 502 Bad Gateway error, indicating a communication breakdown between the load balancer and the backend instances. This led me through a comprehensive troubleshooting process that demonstrates the complexity of debugging distributed systems.

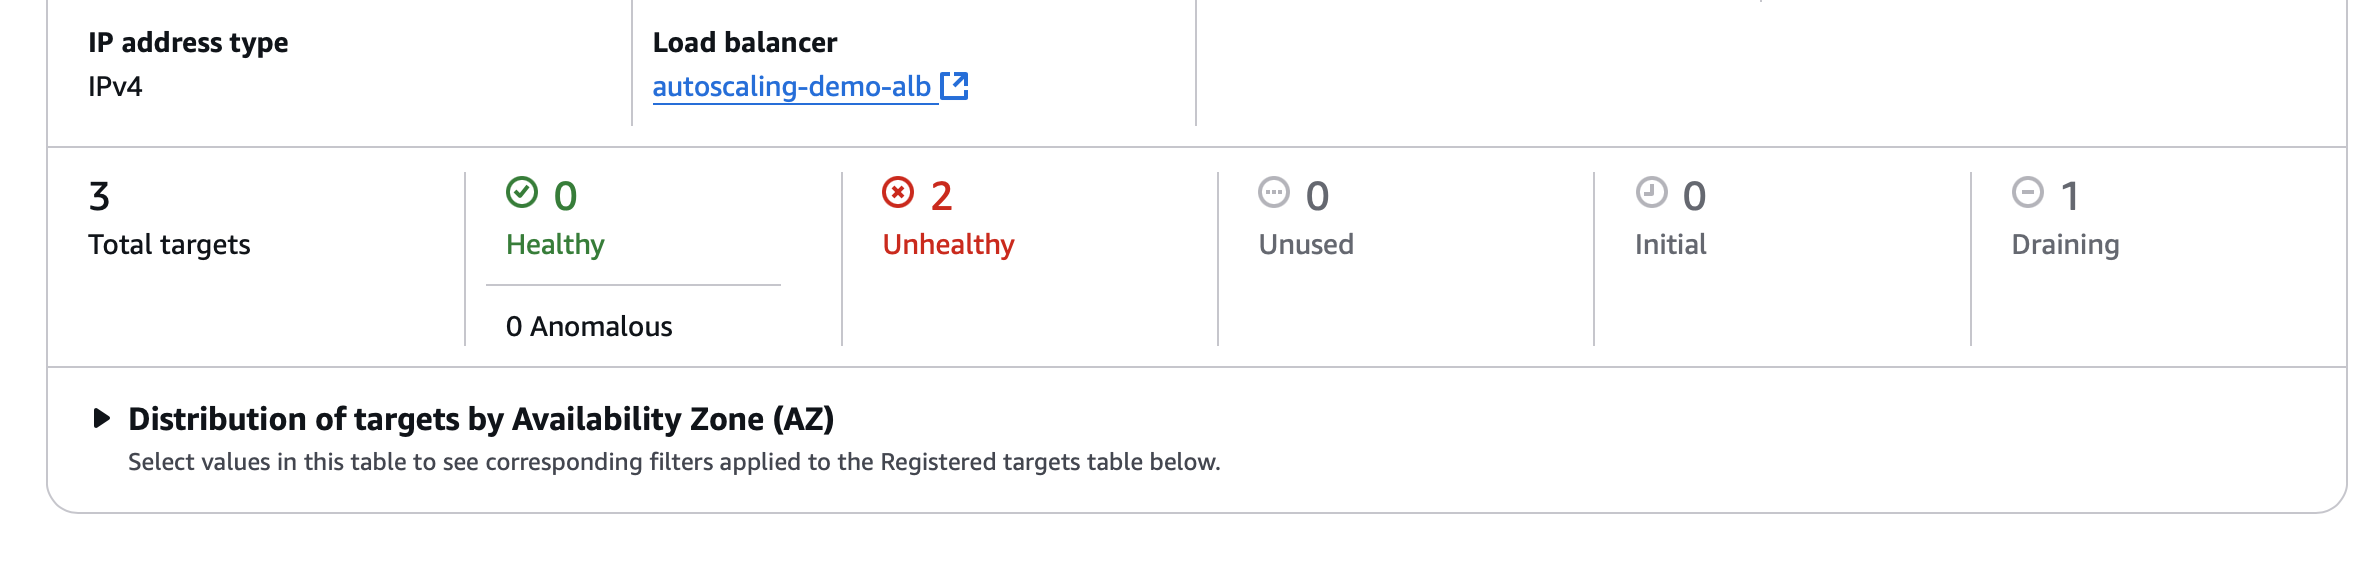
Debugging Unhealthy Targets in ALB Target Group
After confirming that the EC2 instances were running in their designated private subnets, I discovered that while the instances were operational, the ALB target group showed all targets as unhealthy. This suggested a deeper application-level issue rather than an infrastructure problem. A thorough review of security group configurations and the launch template confirmed that the basic networking and instance setup were correct.
Using AWS SSM Session Manager to Access Private EC2 Instances
The architecture’s security-first design presented an interesting troubleshooting challenge. With EC2 instances deliberately placed in private subnets and no public IP addresses or SSH access configured, traditional debugging approaches weren’t viable. The solution required:
- Implementing AWS Systems Manager Session Manager access by:
- Adding appropriate IAM permissions to the EC2 role via terraform
- Creating VPC endpoints for Systems Manager connectivity
resource "aws_iam_role_policy_attachment" "ssm_policy" {
  role       = aws_iam_role.ec2_role.name
  policy_arn = "arn:aws:iam::aws:policy/AmazonSSMManagedInstanceCore"
}

# updated custom policy
resource "aws_iam_role_policy" "ec2_custom_policy" {
  name = "${var.project_name}-ec2-custom-policy"
  role = aws_iam_role.ec2_role.name

  policy = jsonencode({
    Version = "2012-10-17"
    Statement = [
      {
        Effect = "Allow"
        Action = [
          "elasticloadbalancing:Describe*",
          "elasticloadbalancing:DeregisterTargets",
          "elasticloadbalancing:RegisterTargets",
          "ssm:UpdateInstanceInformation",
          "ssm:ListInstanceAssociations",
          "ssm:DescribeDocument",
          "ssm:GetDocument",
          "ssm:GetParameter"
        ]
        Resource = "*"
      },
      {
        Effect = "Allow"
        Action = [
          "ec2:DescribeInstances",
          "ec2:DescribeTags"
        ]
        Resource = "*"
      }
    ]
  })
}
Establishing secure instance access through the AWS console
Go to VPC → Endpoints Click “Create Endpoint”
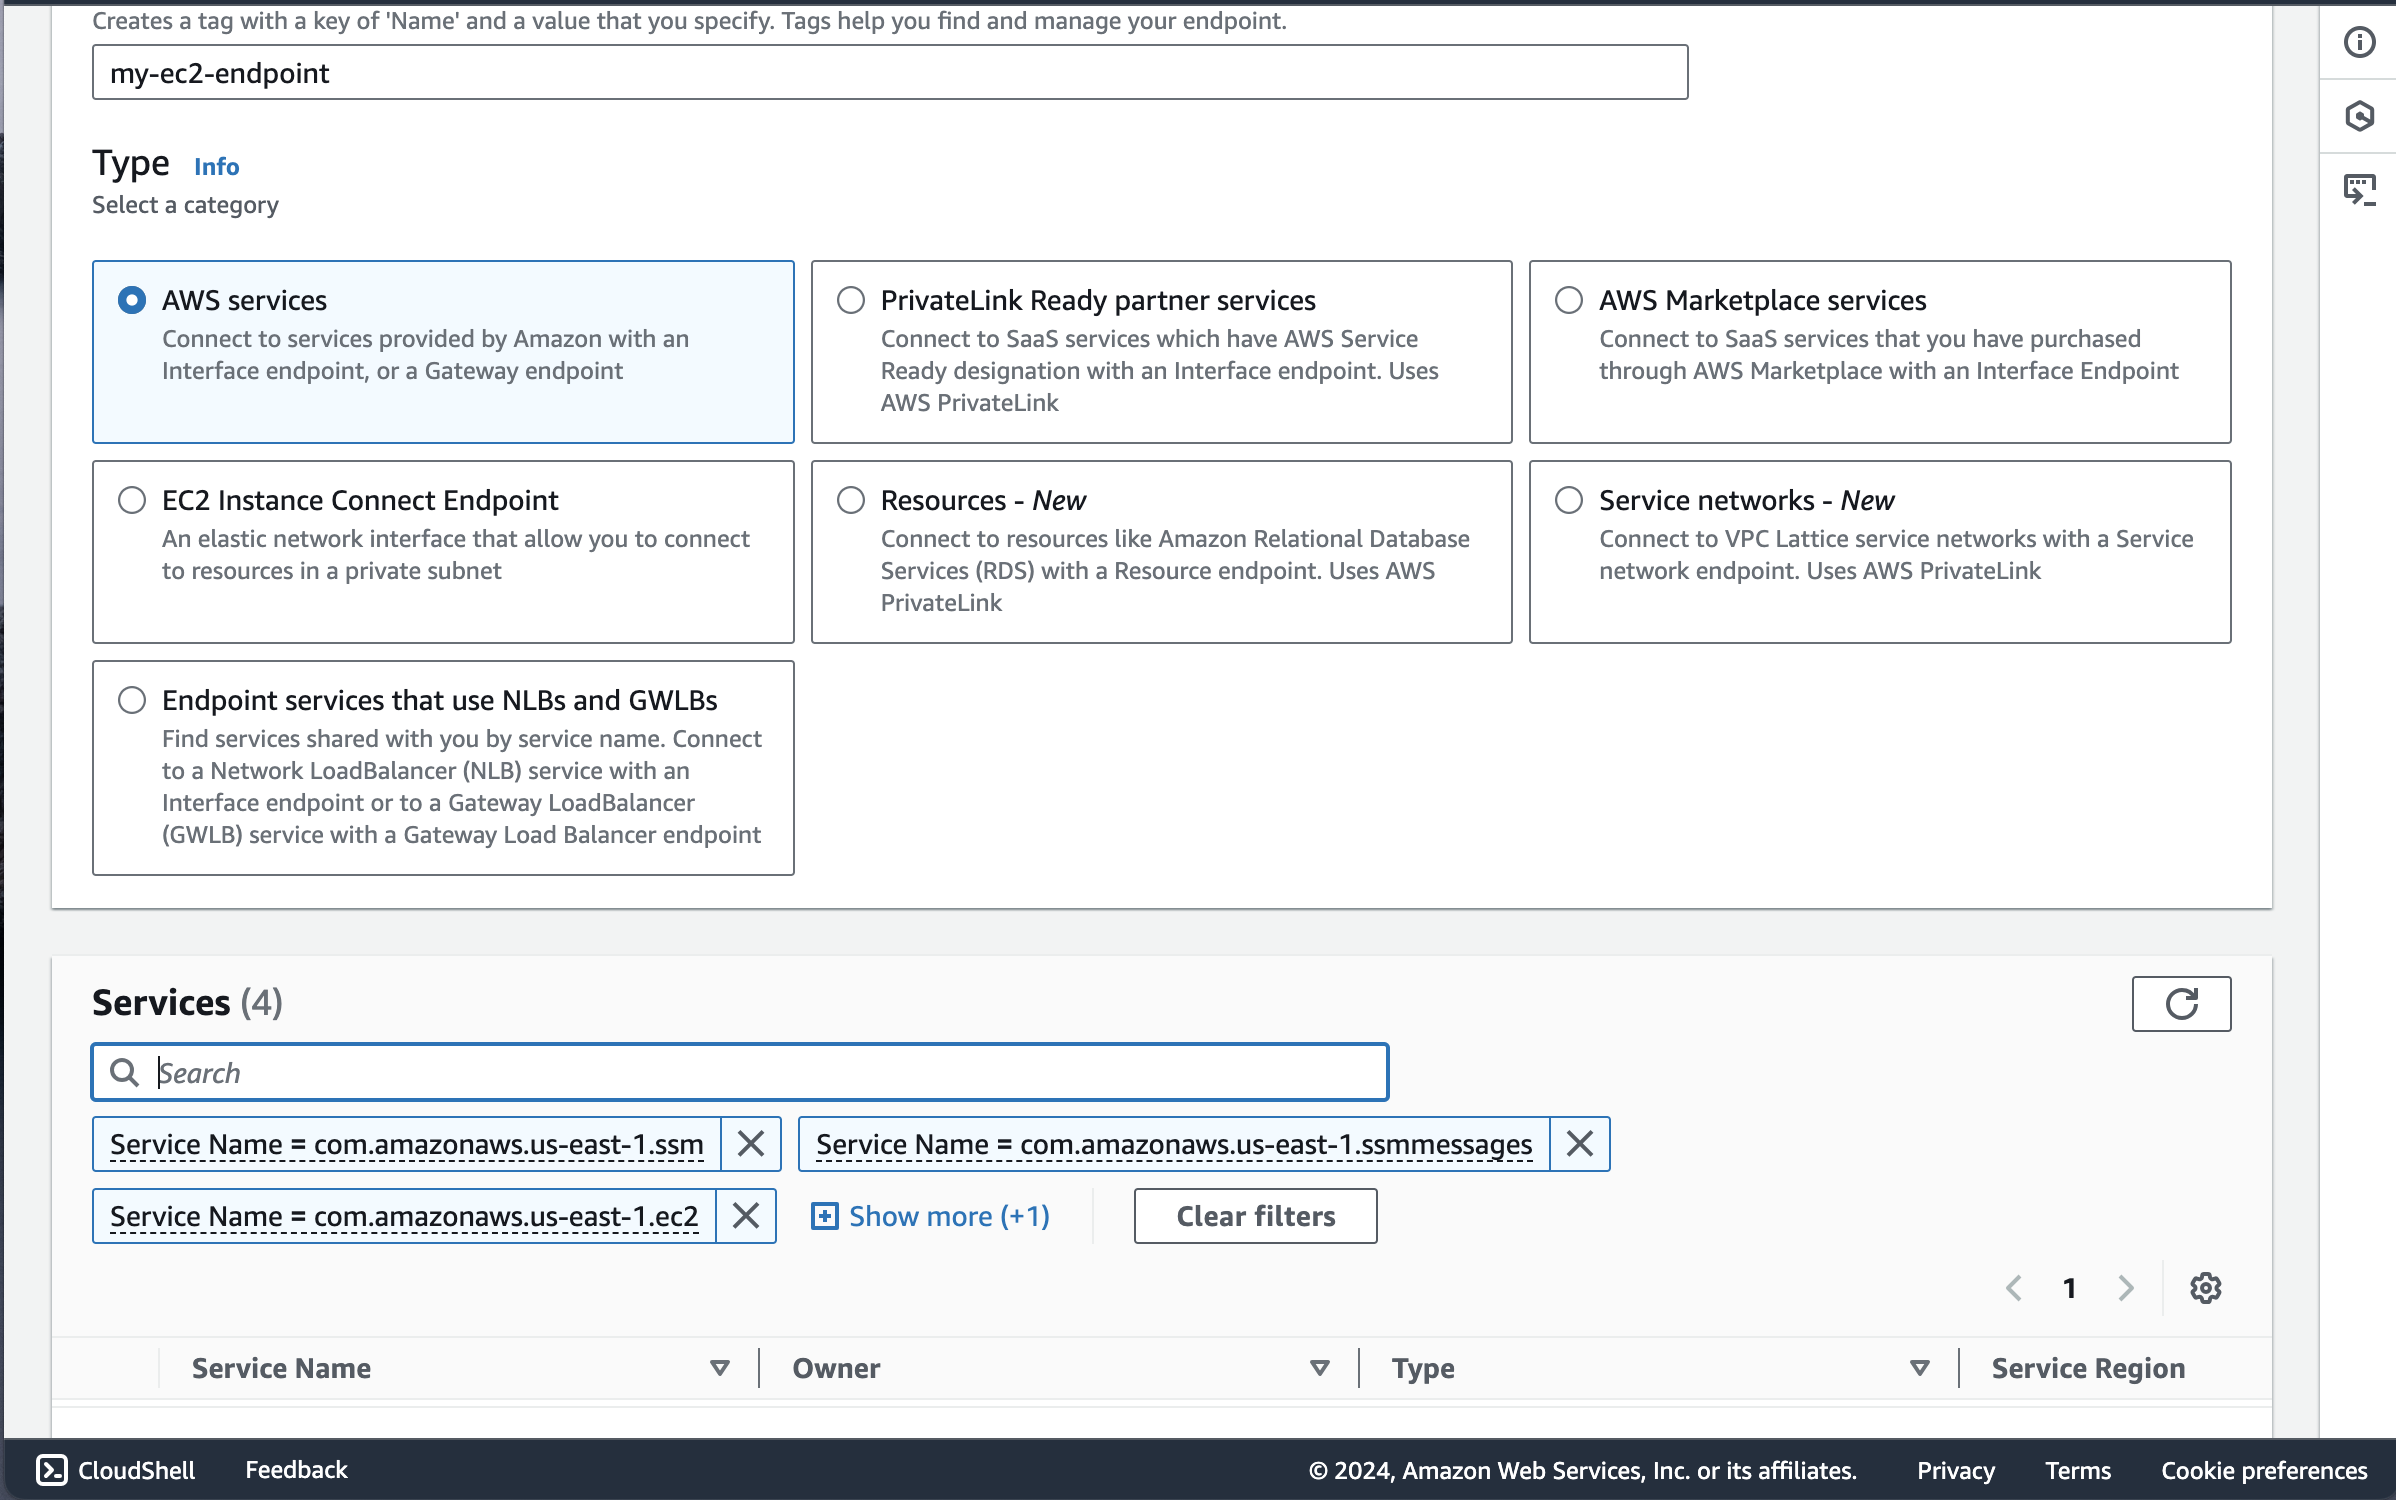
Under services I added these 4 endpoints one by one:
- com.amazonaws.us-east-1.ssm
- com.amazonaws.us-east-1.ssmmessages
- com.amazonaws.us-east-1.ec2
- com.amazonaws.us-east-1.ec2messages
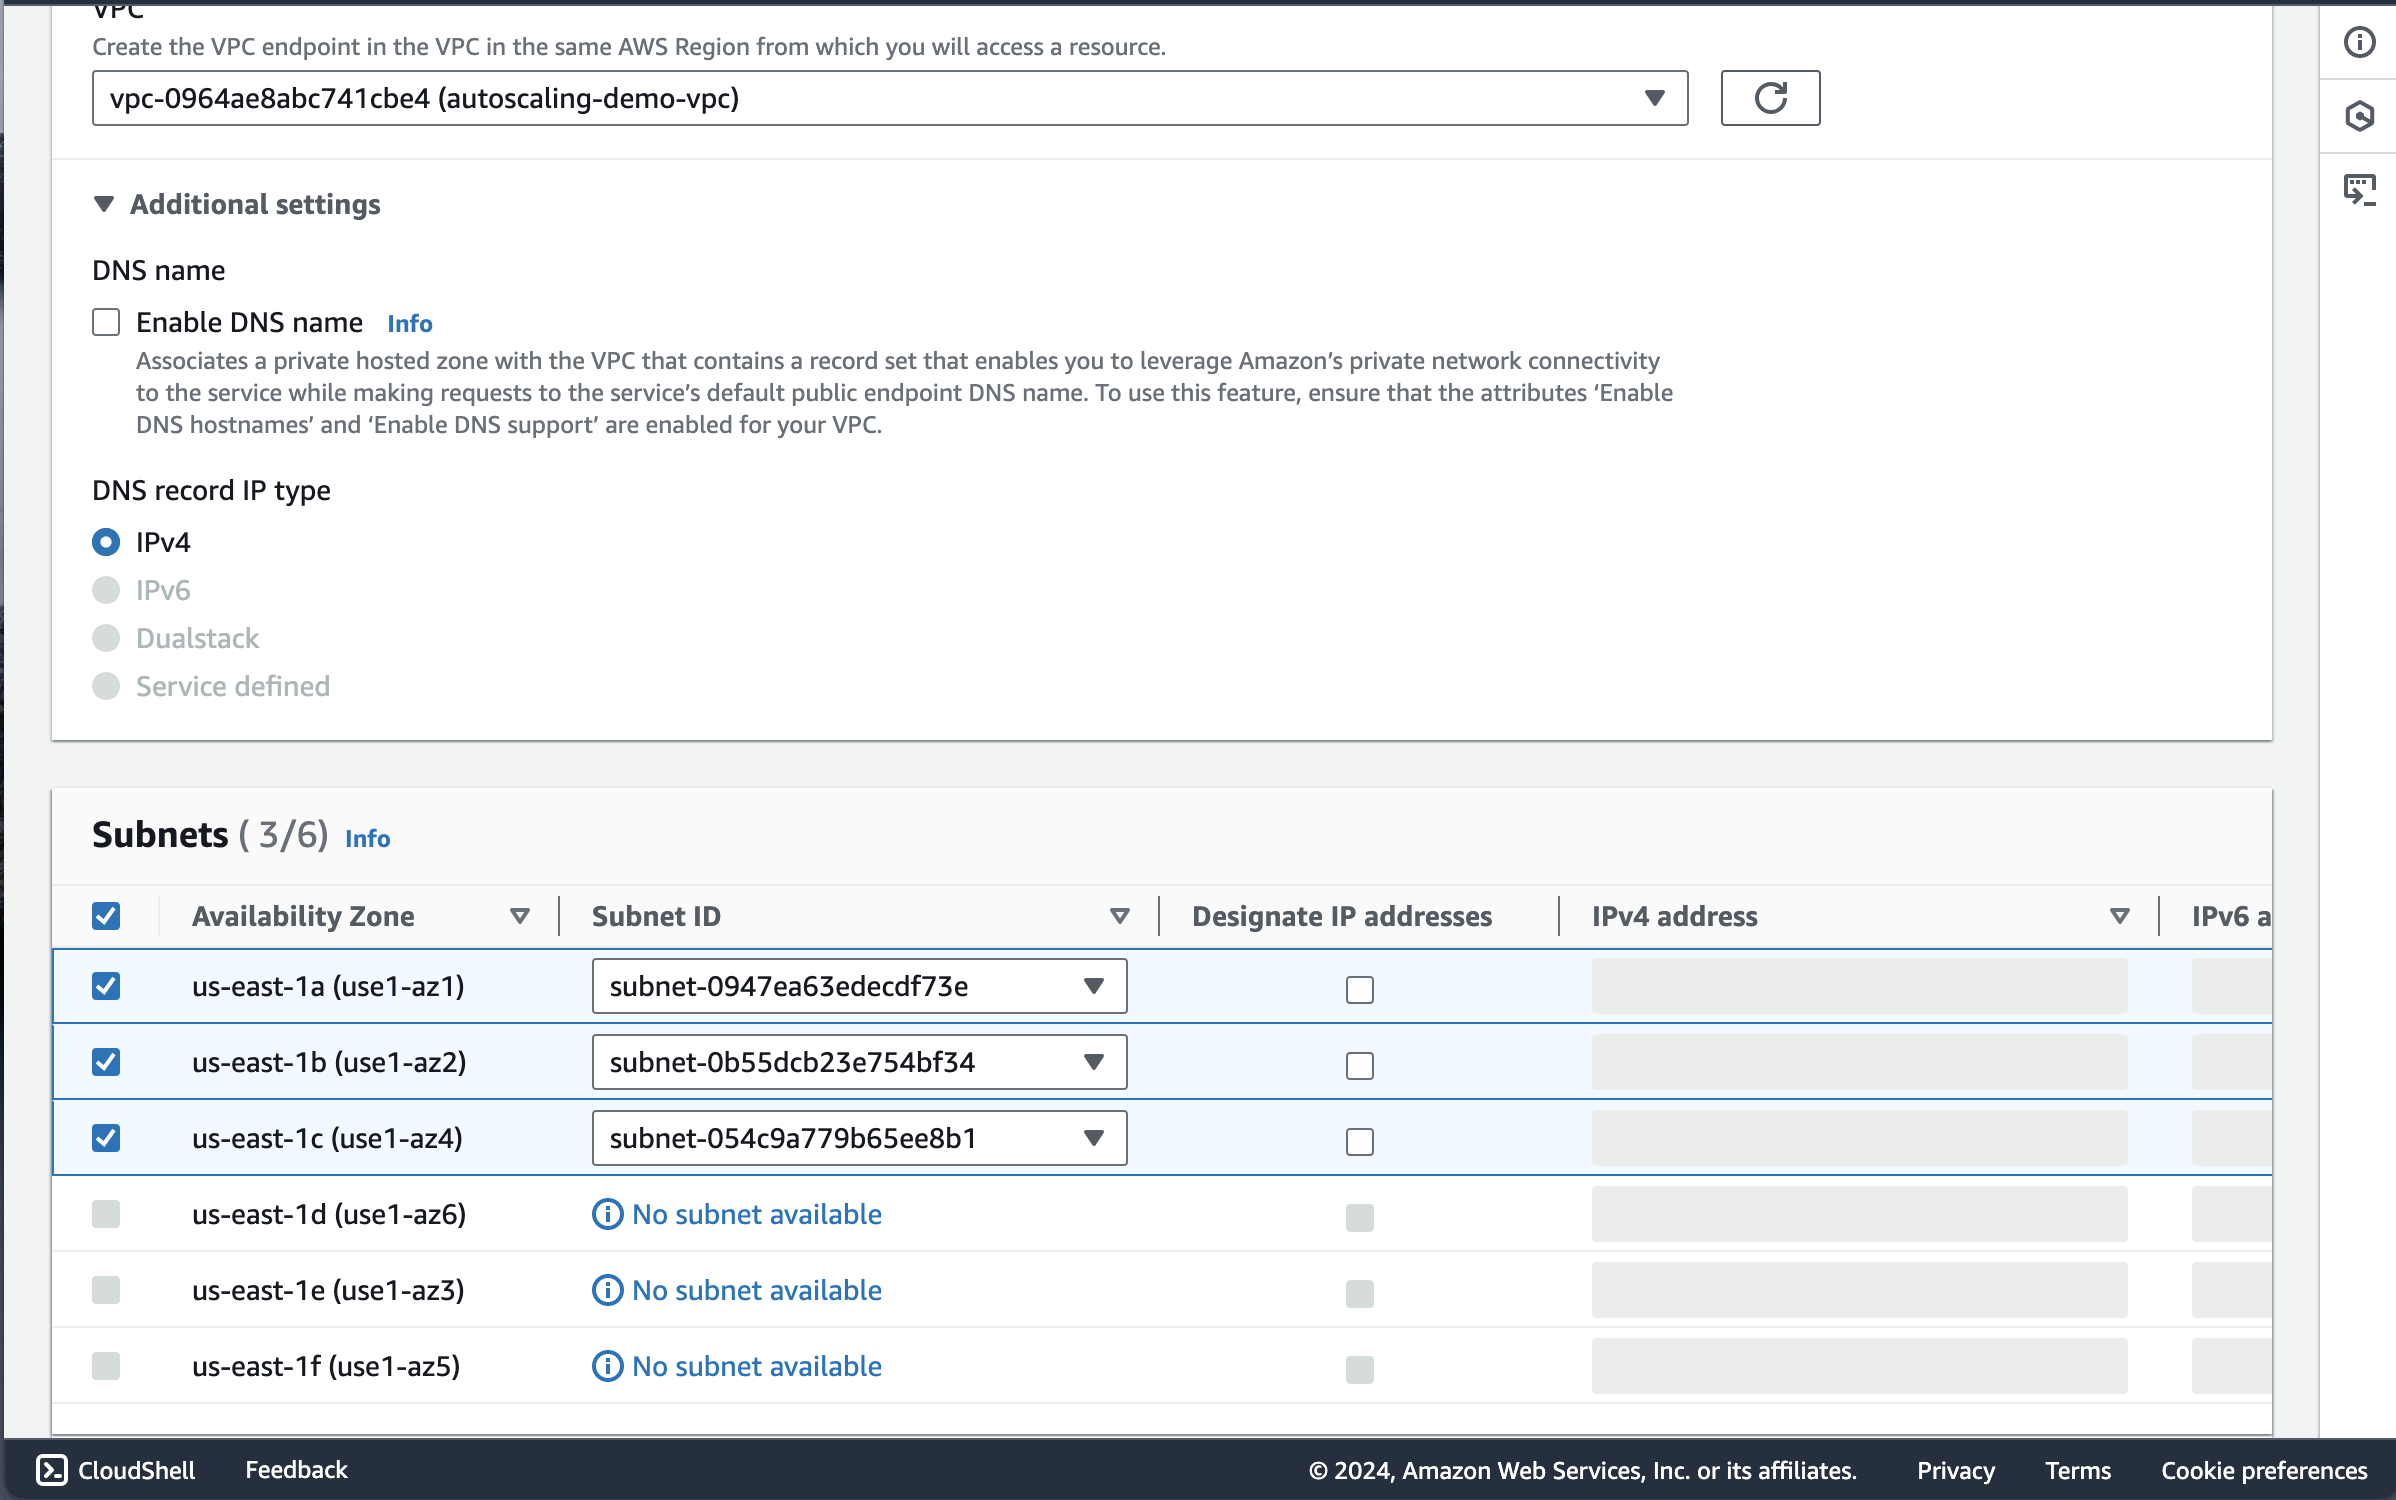
I selected the VPC of the autoscaling group
Make sure “Enable DNS name” is left unchecked since we are working with private subnets.
Under Subnets I selected the 3 private subnets available for all 3 AZs. Make sure “Designate Ip Addresses” is left unchecked we are working with private subnets
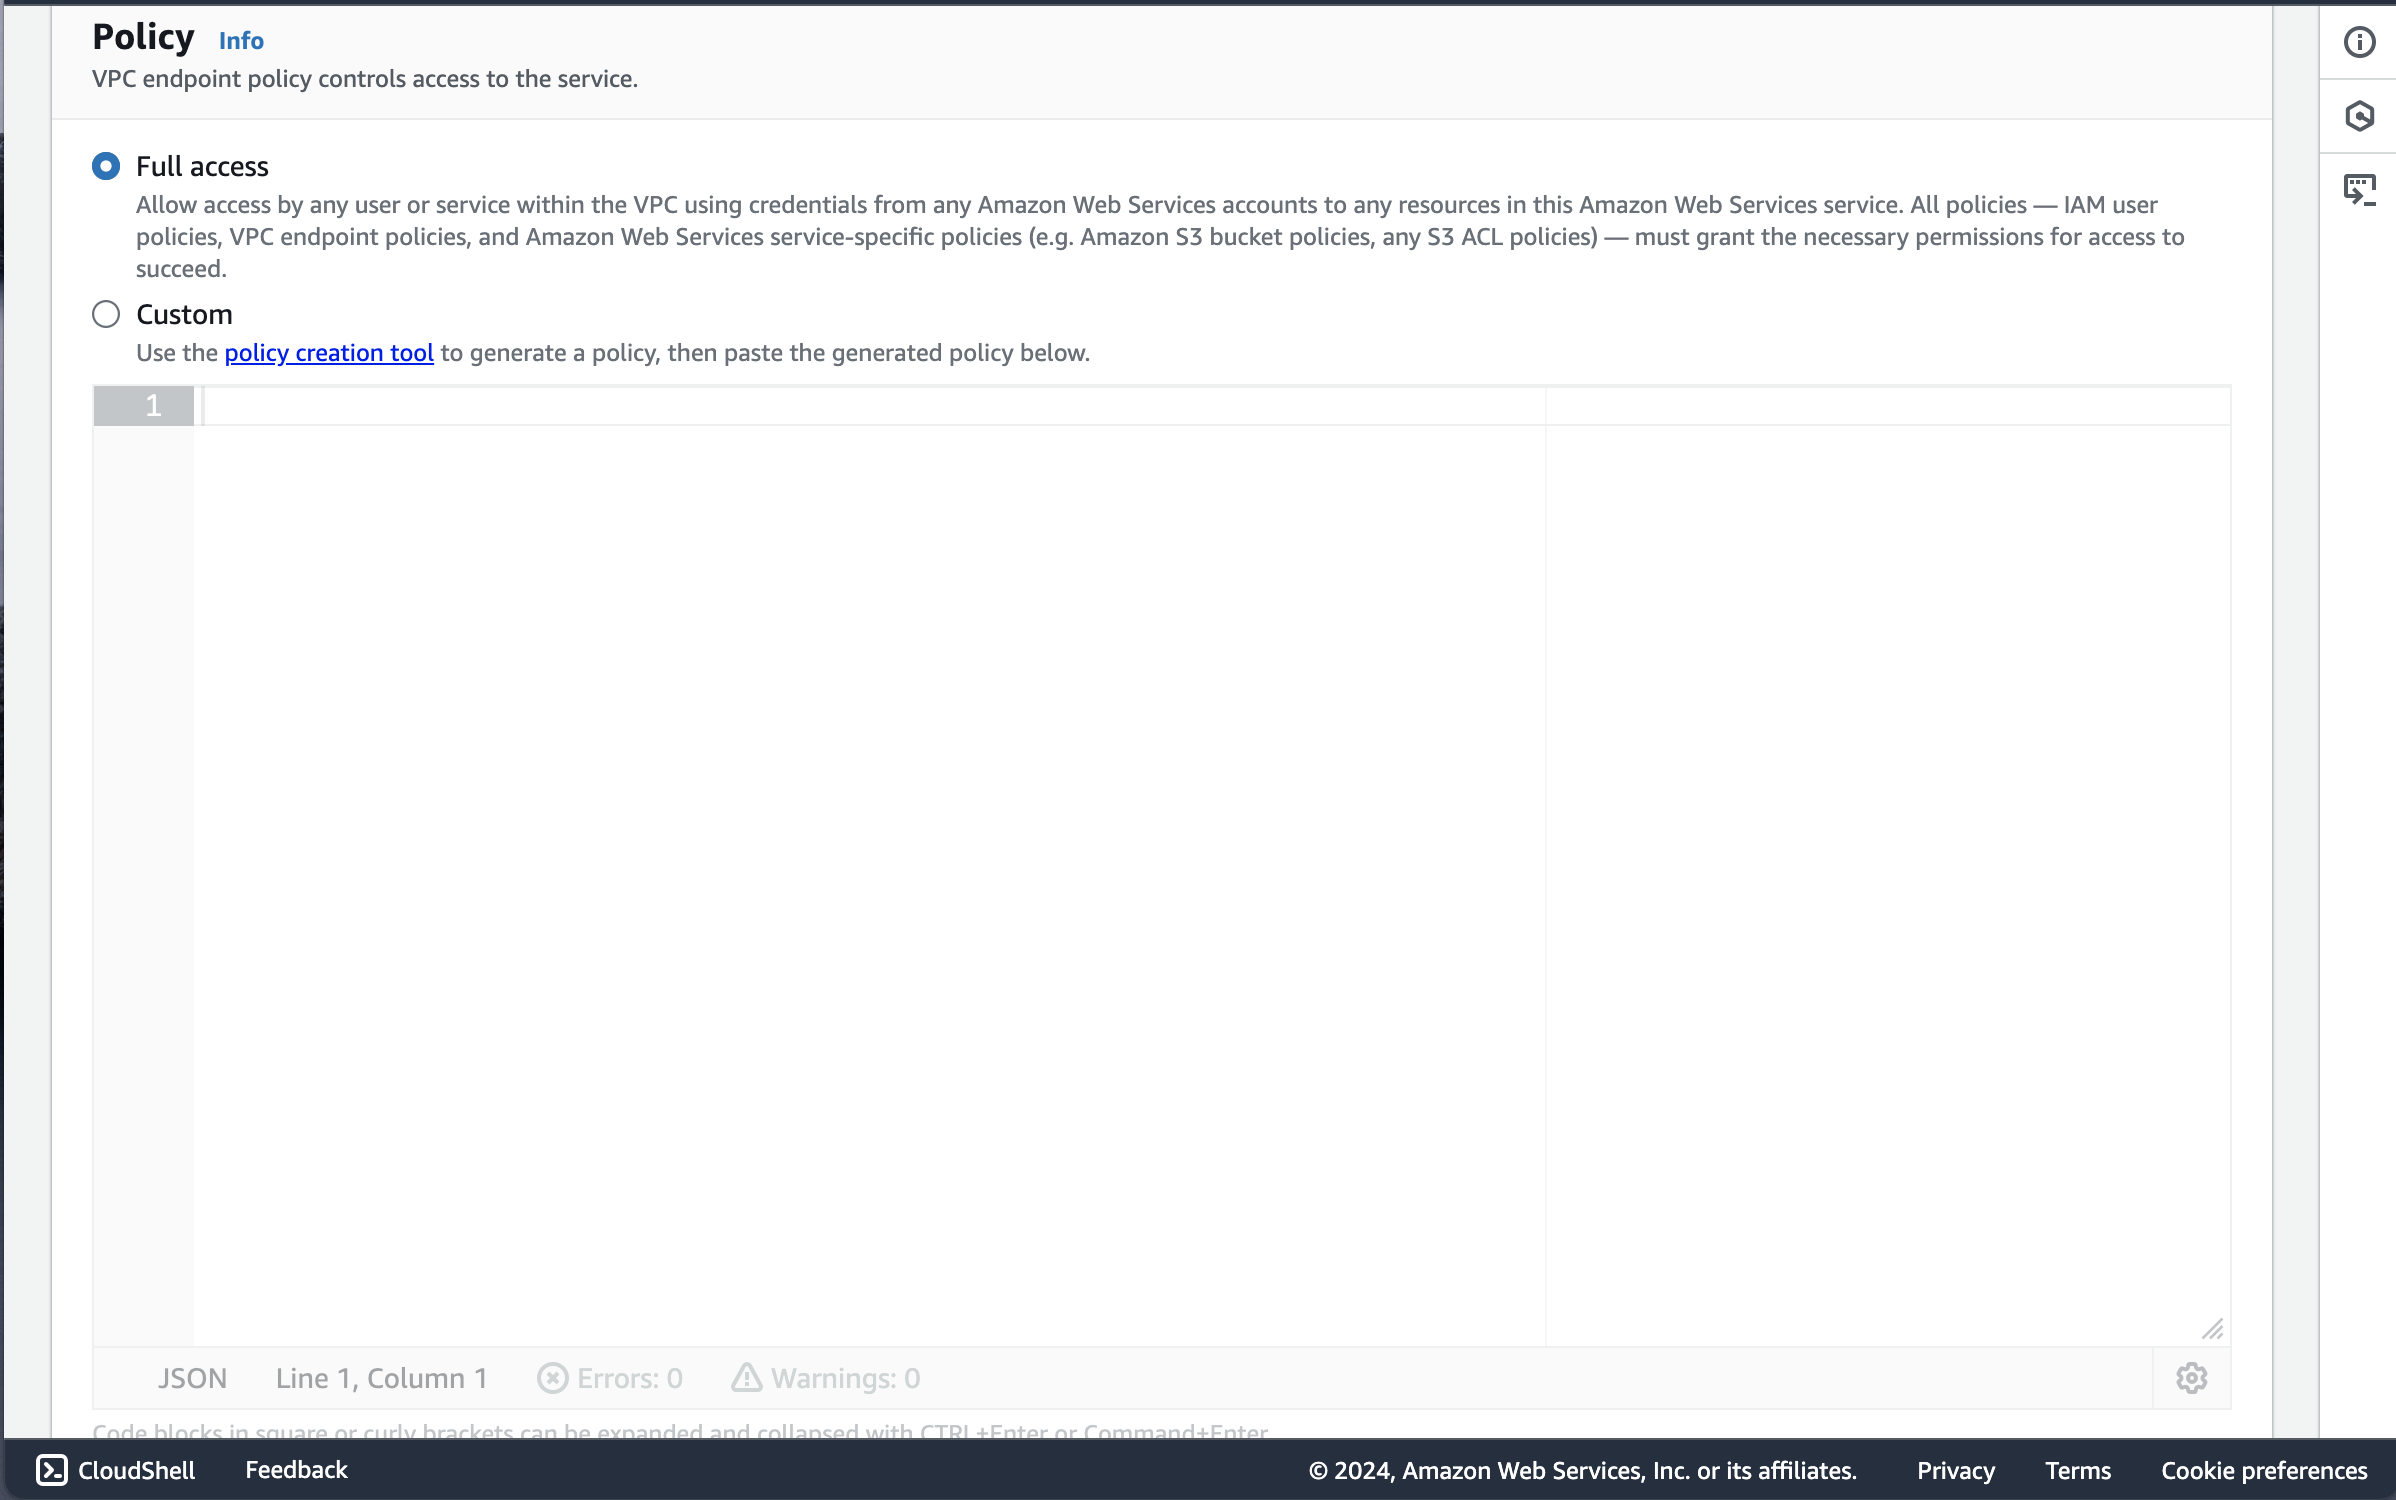
I gave the the policy Full Access since we are debugging
Root Cause: Nginx Not Installed in Launch Template User Data
After gaining instance access through Session Manager, I followed a systematic troubleshooting approach to verify network connectivity and instance configuration:
First, I checked if the NAT Gateway was functioning correctly by testing internet connectivity:
ping google.comThis test confirmed the instance could reach the internet through the NAT Gateway in the public subnet, validating the network architecture was working as designed.
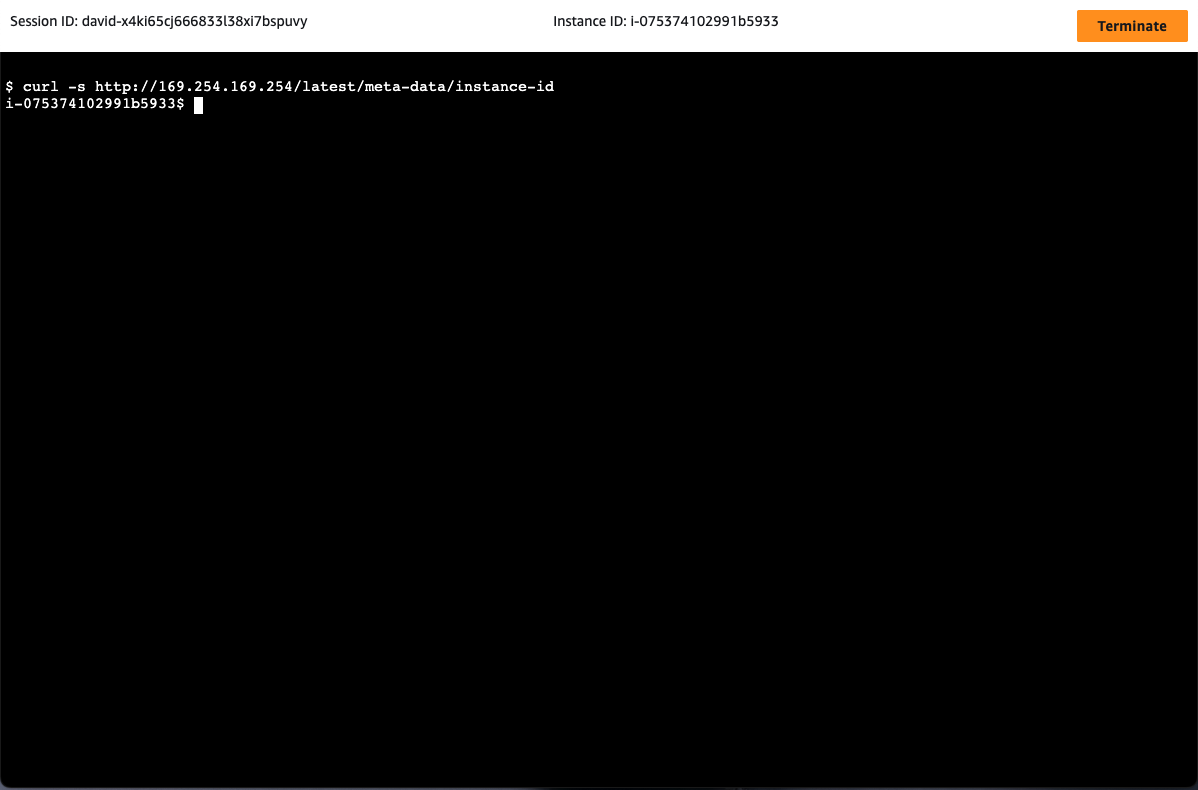
Next, I verified I was on the correct instance by retrieving its metadata:
curl http://169.254.169.254/latest/meta-data/instance-idThis step is crucial when working with auto-scaled instances to ensure I was troubleshooting the right target.
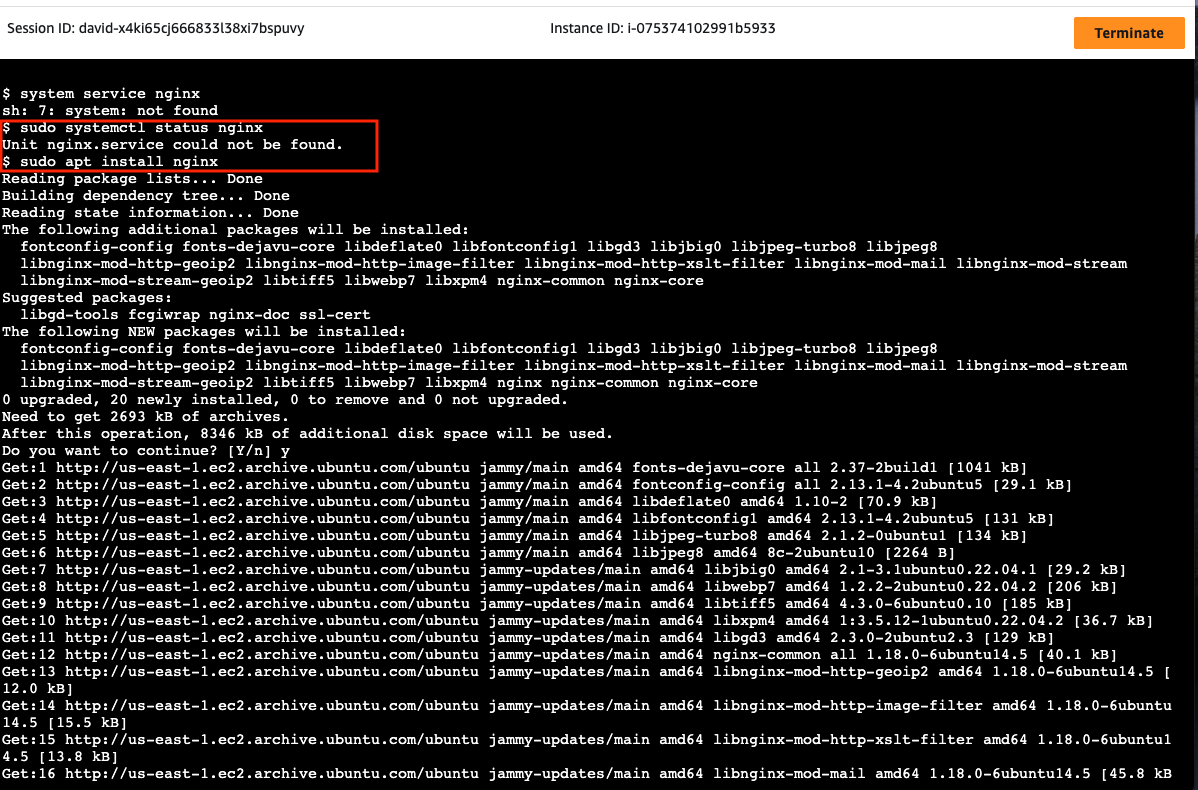
From there I ran the command sudo systemctl status nginx that showed me that nginx wasn’t installed on the instances. This explained the failed health checks - the web servers weren’t present to respond to the ALB’s requests. The resolution involved:
- Manually installing nginx
- Creating the index.html file using sudo tee
- Enabling and restarting the nginx service
Resolution: Fixing Health Checks and Validating User Data Scripts


This troubleshooting experience reinforced several crucial aspects of AWS infrastructure management:
- The importance of validating user data scripts before deployment
- The value of AWS Systems Manager for secure instance management
- The critical relationship between ALB health checks and application state
- The effectiveness of defense-in-depth security practices
- The benefit of testing configurations with spot instances before production deployment